Install The Boe Rear Oil Cooler Solution on a Lotus Exige or Elise

These instructions provide an overview and walk through how to install the Rear Oil Cooler solution from BOE Fabrication.
Why does a Lotus need this?
- The stock oil cooler solution adds more than 16 feet of oil lines, leads to reduced oil pressure, and (depending on model year) uses faulty fittings.
- Over Cooling The dual oil coolers over cool the engine oil preventing reaching ideal temps in the 225 - 290 range. This is extremely import for heavy use track cars.
- Weight The OEM stock cooler solution adds ~30 lbs to the car, mostly in the front.
- Oil Change It's impossible to change all your oil with the stock coolers. At any given time there is roughly 2 quarts of oil sitting in the lines and coolers that doesn't drain during an oil change.
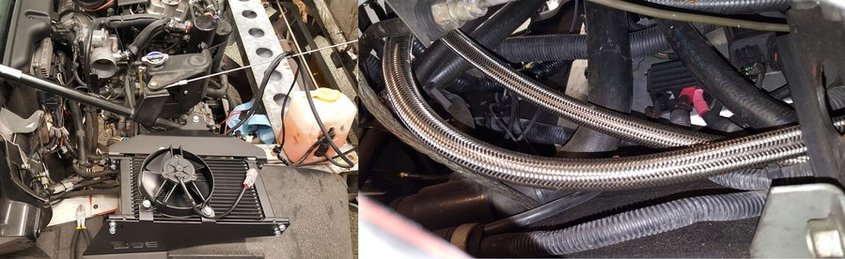
The Solution
Thanks to BOE there is now a simply solution delivered as a kit ready to install addressing the issues listed above. Complete with braided stainless steel oil lines and hardware from Setrab and SPAL.
- Open end wrenches: 6mm, 12mm, 26mm, 27mm
- Ratchet and sockets: 8mm, 10mm, 13mm
- Utility knife
- Flat head screw driver
- 4mm allen wrench
- Oil filter wrench
- BOE Rear Oil Cooler
- (2) M6 nuts (preferably one nylon lock nut)
- Zip-ties
Prep for install
- Lift your Exige on jack stands or with a hydraulic lift.
- Remove the diffuser and panel under the engine.
Follow the instructions here to learn how to safely lift your Lotus Exige / Elise.
Disconnect oil cooler lines from engine.
- Use a Filter wrench to remove the oil filter. This eases access to the two 90 degree fittings on the oil cooler sandwich plate.
- Use a 27mm open end wrench to remove the 90 degree fittings. Be ready for oil to drain out of those lines once removed. Have an appropriate oil storage container or drain pan ready.
- Drain as much oil as possible from the lines and let them hang down over the drain pan.
(Optional) Disconnecting the oil lines at the top of the front oil coolers will allow more oil to run out of the lines in the rear.
- Once the oil has stopped draining use a utility knife to cut the 90 degree fittings off.
- Use the BOE provided plugs to plug the oil cooler lines. Zip tie the lines up and out of the way once plugged.

Remove the air intake.
- Use a flat head screwdriver or an 8mm socket to release the hose clamp (A) securing the intake tube to the Mass air flow sensor tunnel.
- Remove the BOE CAI assembly and set aside to make room for running the new oil lines.

Disassemble mounting hardware.
- Use a 4mm Allen wrench and a 10mm wrench (or pliers) to remove the pre-installed bolts (A,B) from the rear cooler. These will eventually secure the mount to the lower clam.

Install the oil cooler
Mount the rear cooler assembly
The rear oil cooler may be installed in the driver-side or passenger-side rear wheel well. These instructions show how to mount on the driver-side.
- Remove the wedge piece from the packaging
- Use a 12mm wrench to remove the bolt holding the wedge piece together
- Thread the bolt into the arm extending out from the cooler assembly as shown
- Slide the large washer on to the bolt from the bottom (not shown in the picture below)
- Slide the wedge piece on to the bolt and thread a couple of turns to secure it to the bolt.
- Line up the wedge so it can slip into the roll bar tube, slide it in until the large washer is resting on the top of the roll bar tube. This will need adjusted after the next step, so don't tighten the bolt yet.

Secure cooler assembly to body panel
- Place the cooler so the mounting tabs are on the inside of the lower body panel
- Use a 4mm Allen wrench and a 10mm wrench to loosely install the mounting hardware removed in prior steps.
Note: Installing both bolts will prevent securing the rear clam to this body panel from here on out. If you want to continue bolting the rear clam to the lower body panel then only install the one bolt (A) as shown.

Fine tuning placement.
- Adjust the oil cooler assembly to ensure the lower cooler brackets don't tweak the body work once tightened.
- Ensure all the mounts (the wedge piece and lower mounts) are snug to prevent the assembly from moving.
- Test closing the rear clam to verify the fan on the oil cooler does not rub or make contact with the rear clam shell. 1/4" clearance between the top of the fan and the bottom of the clam shell is normal. Repeat these steps as needed until a gap (doesn't matter how big, but should be around a 1/4" or the thinkness of your index finger) is obtained.
- Tighten all bolts
DO NOT OVER TIGHTEN the lower mount bolts! Tighten to a snug position, over tightening may crack the body panel.
Install oil cooler lines
Wrap your 26mm & 27mm wrench with duct tape to prevent damaging the anodized finish on the aluminum AN fitting.

- Feed the two BMRS oil lines down from the driver-side (or passenger-side) location to the sandwich plate, taking care to route out of harms way.
- Connect the swivel fittings to the oil cooler. Take care to ensure the aluminum fittings do not cross-thread. The fitting with a 90 degree bend should be in the back (closest to tail lights) and the fitting with a 45 degree bend in front (by the air intake).
- Connect the 90 deg static fittings at the sandwich plate. Ensure the lines do not bind with anything or each other as they tighten. Ideally the oil line connected to the sandwich plate passenger side fitting will go to the rear side of the oil cooler to force oil to flow up hill.
Note: The hoses have two different ends, one swivel, one static. Ensure the static (non-swivel) end is on the sandwich plate. They're also the only end that will thread onto the sandwich plate.
Electrical
Power You will get power for the supplied relay from the junction block below the ECU where the battery and alternator power leads come together.
Ground You will get the ground from the ground junction basically straight down from the power junction block.
Keyed ignition source The trigger will be obtained from the black wire on the inertia switch for the fuel system.
The BOE kit includes the wiring components displayed in the image below. Ensure you received all of these components.
Note: The wiring connector (A) has to be assembled as outlined in the following instructions.

Assemble the wiring connector to connect the relay to the inertia intercept harness
- Find the single black wire on the relay harness with a pin connector attached (there is only one, the other two have ring terminals).
- Insert the pin connector into the triangle shaped male connector (A) shown above. You can use any of the 3 open pin holes, it makes no difference. Push in until it locks in place, it shouldn't pull back out at this point.
- Insert the white plugs into the remaining two holes on the male connector. This will seal those openings from the elements.
Mount the relay
- Thread a 6mm nut on to the open stud to the left of the ECU until it is in the middle of the stud.
- Use wire cutters to remove the Zip-tie holding the relay and in-line fuse holder together.
- Use the hole from the zip-tie location to mount the assembly on the open stud on the left of the ECU.
- Thread another 6mm nut (preferably a nylon nut) on to the open stud until snug against the relay.
- Use a 6mm wrench to tighten the nuts together. It may be easier with two wrenches.
Note: Ensure when installing you do not flex or stress the plastic mount on the relay and in-line fuse holder. The double nuts are to provide an adjustable secure mount since you can't mount these flush against the firewall.

Wire power and ground
- Safety: Disconnect the positive lead on the battery and ensure the car is OFF. If you have a power disconnect switch that will work too.
- Use a 10mm socket to remove the nylon lock nut securing the cover over the power junction block.
- Open / remove the junction block cover, there is a tab on the right side that has to be released to open it.
- Use a 13mm socket to remove the nut on the power terminal under the cover.
- Insert the RED ring terminal connected to the supplied relay over the power terminal, replace the nylon lock nut, and tighten with a 13mm socket
- Use a 13mm socket to remove the nut on the ground terminal (below the power terminal).
- Insert the BLACK ring terminal connected to the relay over the ground terminal, replace the nut, and tighten.
Wiring harnesses
- Plug the fan wiring harness into any one of the three identical connectors on the relay.
- Route the wire out of harms way UNDER the CAI and connect the other end to the fan pig tail wiring harness.
- Zip-tie the pigtail and wiring harness to prevent free movement and potential damage to the connectors during driving.
*Note: wiring harness uses a 20 amp mini fuse. *

Install inertia-intercept harness
- Locate the inertia crash sensor - It is mounted to the frame directly beneath the oil cooler mount and has a circular rubber boot (A) visible.
- Disconnect the electrical connector (B) from the bottom of the sensor. Squeeze the release on the terminal boot and pull down.
- Plug the electrical connector into to BOE inertia-intercept harness provided with the kit.
- Plug the BOE inertia-intercept harness into the sensor.
- Plug the remaining connector on the inertia-intercept harness into the connector previously assembled on the relay harness.
This will provide a trigger to the relay to energize the oil cooler when in Accessory mode (ACC) and/or engine running.


Test
- Reinstall the oil filter. The old one can be reused if it was keep clean.
- Check oil level and add as necessary.
- Double check all oil line fittings are tight.
- Start the engine and let run.
- Check the oil line fittings under the car and at the cooler for leaks.
- Check oil level after a minute. Obviously the oil level will drop as the new cooler and oil lines fill with oil. Top off as needed.
- Verify the oil cooler fan is pulling air up and not pushing air down. If pushing air down the polarity on the power lines running to the fan is reversed (negative to positive instead of positive to positive).
- Let engine warm up to 180+ oil temp if you have a gauge. This will fully open the oil sandwich plate allowing unrestricted oil flow through the system. The oil cooler should get hot.
- Check for oil leaks again and check oil level
- Reinstall the under panel and diffuser.
- Lower car from jack stands / lift
- Book an HPDE track day and give the oil cooler a proper workout!
DISCLAIMER Last updated August 28, 2021
WEBSITE DISCLAIMER The information provided by the Author ("we," "us", or "our") on howtune.com (the "Site") is for general informational purposes only. All information on the Site is provided in good faith, however we make no representation or warranty of any kind, express or implied, regarding the accuracy, adequacy, validity, reliability, availability or completeness of any information on the Site. UNDER NO CIRCUMSTANCE SHALL WE HAVE ANY LIABILITY TO YOU FOR ANY LOSS OR DAMAGE OF ANY KIND INCURRED AS A RESULT OF THE USE OF THE SITE OR RELIANCE ON ANY INFORMATION PROVIDED ON THE SITE. YOUR USE OF THE SITE AND YOUR RELIANCE ON ANY INFORMATION ON THE SITE IS SOLELY AT YOUR OWN RISK.
EXTERNAL LINKS DISCLAIMER The Site may contain (or you may be sent through the Site) links to other websites or content belonging to or originating from third parties or links to websites and features in banners or other advertising. Such external links are not investigated, monitored, or checked for accuracy, adequacy, validity, reliability, availability or completeness by us. WE DO NOT WARRANT, ENDORSE, GUARANTEE, OR ASSUME RESPONSIBILITY FOR THE ACCURACY OR RELIABILITY OF ANY INFORMATION OFFERED BY THIRD-PARTY WEBSITES LINKED THROUGH THE SITE OR ANY WEBSITE OR FEATURE LINKED IN ANY BANNER OR OTHER ADVERTISING. WE WILL NOT BE A PARTY TO OR IN ANY WAY BE RESPONSBILIE FOR MONITORING ANY TRANSACTION BETWEEN YOU AND THIRD-PARTY PROVIDERS OF PRODUCTS OR SERVICES.
PROFESSIONAL DISCLAIMER The automotive information is provided for general informational and educational purposes only is not a substitute for professional advice. Accordingly, before taking any actions based upon such information, we encourage you to consult with the appropriate professionals. THE USE OF OR RELIANCE OF ANY INFORMATION CONTAINED ON THE SITE IS SOLELY AT YOUR OWN RISK.
AFFILIATES DISACLAIMER The site may contain links to affiliate websites, and we may receive an affiliate commission for any purchase made by you on the affiliate website using such links.
There are 1 Comments.
Say Something.I was just checking out this oil cooler today, looks pretty. Thanks for sharing the install!
You have to log in to comment...
We'll publish your comment after you're logged in.
Written by:mwehnes
Related HowTune Articles
Written by:iturgeon
Replace the Windshield Wiper Blades
Written by:RobT
Repair the Broken Headlight Mounts
Written by:RobT
Resurface the air bag cover
Written by:RobT
Install the Dash Cam
Written by:iturgeon
Change the Oil
Get notified about new articles.
We don't sell or share your info.