Installing Power Side View Mirrors on a GMC Syclone

A popular and very easy modification do to on the exterior of the GMC Syclone is to swap out the horrid "elephant ears" side view mirrors and replace them for the much more smaller and sleeker Typhoon style. Being that the Typhoon came with power mirrors, a majority will just bolt the mirrors on and call it a day, leaving themselves to manually adjust their position.
This article will go through the process of how to install the power switch and wiring necessary to give your mirrors power!
UPDATE
Added wire diagram from Don McCurdy
- Screwdrivers
- Crimp connectors (male/female, crimp couplers, and grounding rings)
- Soldering iron/solder (for good wire connections)
- Heat shrink tubing (best way to cover soldered connections)
- Different color wire, blue, green, white, black, orange/red
- Inline fuse
- Metal hanger or similar to thread wires
If you frequent the junkyard, you may be able to find most all the parts you need for this install (mirrors, the controller switch, wire harnesses, connectors, and bolts). Make sure to get all the female connectors for both mirrors in the doors, the controller, and the female section that plugs into the controller. Note, the control motor requires a hole and 2 screw mounts under the HVAC controls just like the fog light switch mount. Typhoons and Sonoma GTs gauge housings will have this. You can either choose to buy one, cut the hole, or mount the controller elsewhere.
If you plan to buy your parts new, the GM parts numbers are as follows:
- 15693875 Mirror
- 15693876 Mirror
- 15990940 Mirror Screws (6 req'd - sy stock are too short)
- 15631464 Mirror Switch
- 12080237 Wiring Harness
- 12085536 Wiring Pigtails (2 req'd)
- 12101827 Harness Pigtails
- Optional needs ( to retain the stock connectors): The female connectors for each mirror at the door and the controller. Also a Typhoon/S-GT gauge housing (the dash portion that holds the hvac and light control panels) - Typhoons have a hole on the right side.
Wiring Description
Each mirror has 4 wires and a 4 wire male connector coming from the motors.
Driver side has White, Green, Yellow, and Blue wires
White(+) and Blue(-) control Left/Right movement and Yellow(+) and Green(-) control Up/Down movement
Passenger side has White/Black, Green/Black, Yellow/Black, Blue/Black wires
White/Black(+) and Blue/Black(-) control Left/Right movement and Yellow/Black(+) and Green/Black(-) control Up/Down movement
Between the mirrors and the controller, the grounds are combined on each side. Driver's side combines Blue and Green into one Blue wire. Passenger side combines Blue/Black and Green/Black into one Blue/Black wire.
Going into the controller harness are the following 8 wires:
Orange, Power Black, Ground
Yellow, (Drivers U/D(+)) White, (Drivers L/R(+)) Blue, (Drivers ground(-))
Yellow/Black, (Passenger U/D(+)) White/Black, (Passenger L/R(+)) Blue/Black, (Passenger ground(-))

UPDATE - Don McCurdy contributed some of his own info and this awesome wiring diagram.
Connector & Wire Prep
Solder the mirror connectors to the extra wire needed to reach into the dash. With each connector, solder the blue and green wires together into one blue wire. The other two were soldered to their own extension leaving 3 (three) wires from each mirror going to the dash. The wires will end up being about 5-6 feet long, and it's not a bad idea to cut them a little longer just in case. You can judge length by holding them up where you think they'll go. Installation of the wires should start at the door and go toward it's destination.

Onto the driver door panel. There are 2 (two) phillips screws in the door handle holding the arm rest on, it will come out by sliding toward the rear of the door.

Separate the numerous push in fasteners by pulling at the door panel. I start at one of the bottom corners and pull away from the door. Note if you have the proper pulling tool, use it! Otherwise a long flathead screwdriver can assist in the fasteners that dont play nice. Careful to protect any areas as to not to cause damage to your truck!
After all the door fasteners are all loose, pull outward and upward on the panel. Once the panel releases from the window seal, pull the window/lock controls off and place the panel aside.

Next, disassemble the bottom of the driver's side of the dash. Remove the kick panel, fuse cover panel, and the brake/gas pedal panel.
Remove the screws (the ones you can get to) from the black plastic piece on the outer foot well. This panel seals a hole that will allow you access to the wires/grommets going to the doors.

Now the aim is to get the non connector end of the wires through the door grommet and into the interior. To aid in this step, go to your closest and grab a metal hanger. Unbend the hanger and create a small loop on one end. Insert it carefully through the grommet you need to get through, then thread your wires into the loop in the hanger, and pull the bunch back through the grommet. Of course, you have to be careful and take your time to not damage the wires/rubber in the process.
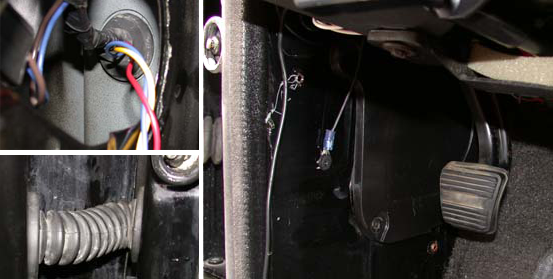
There is a second grommet that most of the wires enter to get through the inner wall, however I couldn't manage to fit any extra wires through it, so I just ran them into the black panel that we half way removed to access the door's grommets. Now that wires are inside the truck, pull until the connector has enough slack for you to plug/unplug the mirror's connector.
Digging into the Dash Housing
Remove the dash panel under the steering column. Remove the ALDL connector's 2 (two) screws. Remove the bolts on the bottom, screws on the front, and the screw holding on the e-brake handle. You should be able to swing it out of the way without removing the cable.
On the gauge cluster housing, remove the 2 (two) screws holding the fog light control on, then the 3 (three) hiding under that. The light control panel will now be loose enough to pull out, slide down and out of the dash. The light control has 2 (two) connectors, remove them and set aside the panel.

Now remove the hvac controls, there are 2 (two) screws holding this on just as the light controls were held on. Slide down and out.
Welcome to your own personal hell, this is the worst part of the job. There are 3 (three) connectors on the HVAC panel along with a vacuum harness and a pull cable for the vent doors. The thing wont move but what seems like 2 inches out of the dash, so begin with a screwdriver to remove the connectors you can get to.

Once the connectors are off, the cable pull is next. There is a flat metal push on retaining washer on the cable's post. Try using pliers or a screw driver to back this off the post. Once it's off, there is a red plastic piece that is held in by a metal clip. Slide a screwdriver into this from the opposite side to release.

Now for the vacuum lines. The harness is held on using 2 (two) of the same retainer washers that were on the cable, one on each side. Get these off and carefully pry the spongy rubber away, side to side, until youre free. I had to keep pulling and pulling to the point that I was sure that I was going to damage the vacuum hoses in order to get the panel out far enough to detach the parts. Turns out, the other end of these vacuum lines are easily accessible under the dash. You can see the connection in the diagram below.

Last is 2 (two) screws, the top inside the control panel holes in the back of the dash. Unscrew and remove the gauge housing. At this point, has your cussing vocabulary expanded?
Dash Wire Routing and Hookup
To help in routing the wires, I removed the gauges. It's 2 (two) screws on the bottom corners and the two nuts on the top. Carefully pry the housing away from the top studs and it will come right out. Make sure to wedge between the white plastic and the metal brackets to keep from damaging anything.

Now route your mirror harness behind the cluster where the other wires are, around, and into the hole for the HVAC controls. Your done with the driver door, so cut the wires with a little extra length.

Moving to the passenger side, remove the door panel in the same manner as the driver's side. Remove the kick panel, under-dash trim, radio bezel, and loosen/remove the radio. Use the same trick to get the wires through the door grommet. This side has a vacuum controlled vent for the HVAC controls, so it well bend enough for you to wrestle the wires through. With the same treatment like on the driver side, remove the screws you can get to on the black plastic sealer/HVAC door. Reach around and pull the wires through, routing them upward.

Route the wires up and loop them into the dash as much as possible. Having the radio out will help you thread the wires through the back of the radio cavity of the dash and up into the HVAC control hole.
Now both doors wires are in the right place. Crimp the wires here to the connector for the controller. The striped wires control the passenger mirror, and non striped control the drivers side.
Connect the blue, yellow, and white wires for each mirror to the connector. Connect a long ground and power to the orange and black wires respectively. The ground can be run with an o-ring crimp connector to one of the steering column bolts. This ground seems to work well without even sanding the finish.
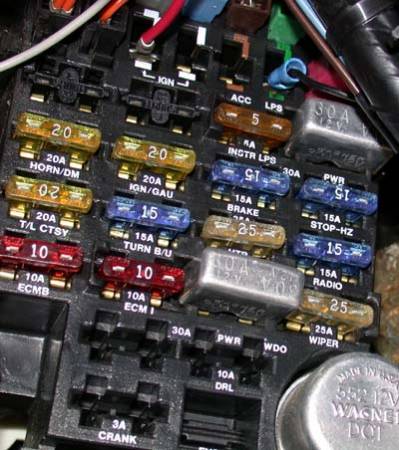
The power will have to be run under the dash and to the fuse box. Connect a male blade connector to the end, and insert into the ACC or IGN port (these will only power with key on). It would be a good idea to put a inline fuse between this power and the controller.
Connect the controller switch and turn the ignition to on (not start). You should be able to test the mirrors and direction of movement at the same time. If everything looks good, you can begin putting everything back together. The HVAC controls again are the only point worth mentioning. I connected all the connectors, the cable, and reinstalled the retaining clip before attaching the vacuum connection. The advantage to the hole needed for the motor control comes in here, you can stick a finger in there to help push the vacuum connector onto the posts. This isn't an issue if you disconnected the other end to get the slack needed to remove them.
There are 2 Comments.
Say Something.If anyone is interested, including the author...
I used this process to install Typhoon mirrors on my Syclone, and they are operational. What isn't here is a wiring diagram. I used the authors description of wire colors, worked out the diagram, and tested it on my own truck. It works.
I can email it to you to help your installation, or it can be added to this "how-to" article: dmmb at att dot net.
Donald.
Thanks @Donald! I embedded your wire digram into the article. Many thanks!
You have to log in to comment...
We'll publish your comment after you're logged in.
Written by:syo237
Related HowTune Articles
Written by:iturgeon
Replace the Front Wheel Hub And Bearing
Written by:Syclone2904
How to install the Scanmaster G
Written by:iturgeon
Tuning the TurboTweak Velosyty Chip
Written by:syo237
Replace the Lumbar Support Hose
Written by:iturgeon
Hotwiring the Intercooler Pump
Get notified about new articles.
We don't sell or share your info.