Plastidip The Emblems And Badges on a any car

Learn how to black out or Plastidip your badges and emblems with this simple guide.
Plastidip is the perfect tool to change the color emblems and badges on any car. It's not permanent, it's super easy to remove, and it's really easy.
My Scion FR-S was begging me to debadge it, but the Scion badge has posts that fit into holes in the car, so the easiest thing to do is black out those.
Consequently, the "FR-S" badge doesn't have these mounting studs, so it can easily be removed.
- Scissors
- Toothpick or long fingernails
- Plastidip
- Blue Painter's Tape
- Lots of Newspaper or masking paper
Clean the surface
Wash and dry your car, or at least the area you plan on painting. Dirt and grime will reduce the quality of your work. Plastidip may be temporary, but if you like the finished product, you're likely to keep it for a long time, so let's do this right.
Mask Off Your Painting Area
Spray paints get EVERYWHERE. You need to mask off a large area to protect things around your project from getting specs of Plasti-dip on them. I figure a good assumption is anything in a 4 foot radius is very likely to get some paint on it. So mask of at least that much area around your badges.
Fortunately with plastidip, the permanence of this danger is reduced, but it's still a pain to clean up later, so just tape of everything you don't want paint on.
Add several feet to your coverage area if it's windy at all. Remember, Plastidip comes off easier when it's several coats thick in one continuous layer. Those little overspray droplets are a pain.
In this case, the emblem has some holes in it where the body shows through. I don't want those to be plastidip when I'm done, but I know I'll have a good solid coating that I'll be able to just peel that off when I'm done. Also note the hap-hazard masking around the emblem is possible simply because the plastidip will peel off. Don't do this with regular paint, your masking must be much better with paint.
Note: I didn't mask off enough of the hood in this photo.

Spray the Plastidip
Spray the plastidip as directed (don't forget to shake the can and follow the instructions).
Here are the official PlastiDip instructions:
Surface must be clean and dry. For best results avoid direct sunlight, high humidity, or breezy conditions.
- Shake can vigorously for one full minute after metal mixing ball contained in the can begins to rattle. Shake often while applying.
- Hold can 12 - 16 inches from surface, moving can back and forth slightly overlapping each stroke. Apply heavy enough to produce an even, wet appearance.
- Allow 30 minuts minimum between coats. Apply as many coats as desired (3-4 average).
- Allow 4 hours minimum dry time before use.
Coverage: Approximately 4-10 sq. ft. per can.
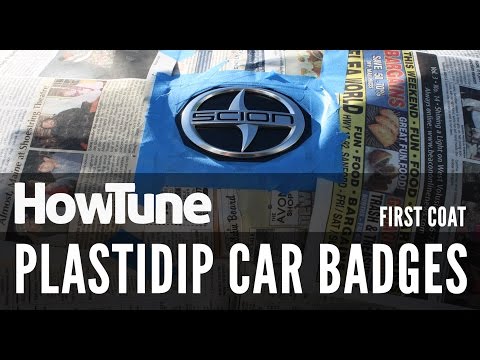
Below is a photo right after my first coat. Note you can still see some of the chrome coming through the thin first layer. You'll coat the badge in many coats before you're done, but I prefer to split the first one into 2 light and quick coats to help keep the paint from dripping on the following heavier coats. Don't worry about the first coat completely saturating the emblem, as you can see below, some of the bright chrome of the badge is still visible.
I'll do the first 2 light coats 10-15 minutes apart, then spread the following heavier coats closer to the suggested time of 30 minutes.
I sprayed another 5-6 coats to thicken up the black and make sure I sprayed from every angle around the emblem. If your first coat is from directly from the front, spray your second from the bottom, third from the top, and subsequent coats from different angles to help you get good coverage from every angle.
If you're unsure if you've waited log enough, you can test the masked off area by touching it with a finger. If it transfers any paint to your finger wait longer.
After 5-6 coats the badge and area around it should be pretty solidly colored. Let it dry for an hour or so before you begin to remove the extra paint and masking paper.
Remove When Dry
Once it's dry, simply peel off all the masking paper and tape. The paint may come with the tape, so in the areas where you want it to stay stuck to the car, peel very carefully.
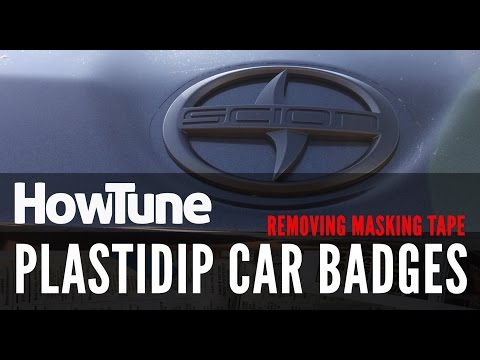
If you have any areas where the Plasti Dip is attached to the paint that you want to remove, now is the time to peel it away.
Form a small hole or peel up an edge using a soft plastic tool or something like a toothpick. Below you can see how I peeled the paint out of negative space in the badge.
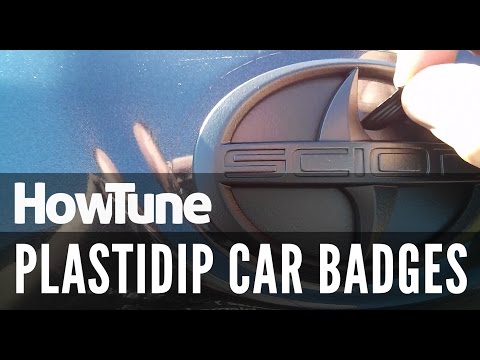
Now you have a finished blacked out badge. Make sure to let the paint completely dry for about 4 hours before it gets wet.
Continue with the rest of the badges as you see fit. Since I was painting several different badges at once, I masked up everything at once and painted each in turn so that I wouldn't spend all day painting them one at a time.
Here's the back of the FR-S with the Scion badge blacked out and the FR-S badge itself debadged. A subtle but clean look I think.

There are 0 Comments.
Say Something.You have to log in to comment...
We'll publish your comment after you're logged in.
Written by:iturgeon
Related HowTune Articles
Written by:Offthethrottle
Change And Maintain Tires
Written by:ijdmtoy
Install the iJDMTOY LED Light Bar
Written by:iturgeon
Change the Cabin Air Filter
Written by:syo237
Replace the Idler Arm
Written by:cpeterson
Bleed the Brake Fluid
Get notified about new articles.
We don't sell or share your info.