Change The Spark Plugs on a Chevrolet HHR

The Chevy HHR uses a modern electrical distributorless ignition system, meaning that it does not utilize a distributor and spark plug wires, but instead a coil pack to deliver controlled electrical power to fire the spark plugs. This not only cuts down on parts needed, but makes for a much more efficient ignition system.
Chevrolet recommends changing your HHR's spark plugs every 100,000 miles. No harm will be done if you choose to do yours sooner. This article covers how to change your spark plugs in your Chevy HHR.
- 5/8" spark plug socket
- 10mm socket
- Flathead screw driver
- Socket Wrench with extension(s)
- Anti-Sieze Compound
- 4 Spark Plugs - AC Delco 41-103
Remove the Engine Cover / Air Filter
The engine cover and air box is built into one piece. To remove this piece, first start by unplugging the MAF sensor and loosening the the hose clamp screw on the front intake tube. You dont have to take the hose off just yet, it will come off once you begin to pull out the cover.


Next, on the backside of the cover on the passenger side is another hose. Loosen the screw and remove this hose.


Now grab the cover nearest the firewall and pull it towards the front. The cover will pop off of its rear mounts. You should now be able to lift up and easily remove the front hose (remember, you didn't take it off) and then remove it entirely from the vehicle. Set aside.
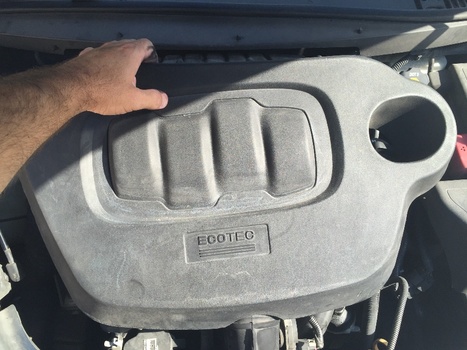
With the engine cover now off, you can now see the 4 ignition coils. Under those coils are your spark plugs.

Removing the Spark Plugs
Before you begin to remove the plugs, clean off the surrounding area of any dirt and debris by using an air hose or any means necessary. By cleaning the area, you will not risk having foreign objects (dirt, rocks, bugs, etc) accidentally falling into the spark plug hole and causing possible damage to your engine.

Remove the pigtail harness that plugs into each ignition coil pack by pushing down on the top tab and pulling backwards towards the firewall.


Using a 10mm socket (a small extension will help), remove the single bolt that is located to the right side of each coil pack.

With the bolts removed, carefully pull straight up on the coil pack to remove it. Set off to the side.


The AC Delco plugs are pre-gapped and ready to use. DO NOT try to gap these plugs!


Carefully put the plug back into place. I prefer to hand tighten at first as to ensure I am not cross-threading the plug. Once the plug is started, I finished with the socket wrench and tightened until snug. You DO NOT need to tighten the plugs with excessive torque!

With the new plugs in place and tightened, replace your coil packs back into it's respective home. You should feel the coil pack pop down onto the plug.


Replace Engine Cover
If you need to replace the air filter on your HHR, now would be a great time to do it. Read how to change your air filter here.
Replace the engine cover in reverse of how it was removed. Attach the front back onto the front of the air box (do not tighten yet) and then push down on the back side to pop it back into its mounts.
All finished!
There are 1 Comments.
Say Something.Well, thank you very much, it was exactly the steps I needed to do. It gave me the confidence that I would not run into complications, and saved me money. It was 100k miles service item on my list, replace all sparkplugs. Local Sullivan Tire quoted me $120 to do it. Crazy. The plugs cost $38 for me. I took my time, for an enjoyable, easy procedure. Changed the air filter while I was at it. Note that air filter housing is secured with 7 star-head screws. Be ready with your star-head drive (torx?).
You have to log in to comment...
We'll publish your comment after you're logged in.
Written by:syo237
Related HowTune Articles
Written by:syo237
Replace the Door Handle
Written by:syo237
Change the Front Brake Rotor
Written by:syo237
Replace the Front Brake Pads
Written by:syo237
Changing the Air Filter
Written by:syo237
Change the Brake Light Bulb
Get notified about new articles.
We don't sell or share your info.