Replace The Idler Arm on a GMC Syclone

Are you starting to see uneven tire wear and/or feeling your truck want to pull to one side when driving even though you have a good alignment? Chances are your idler arm has given up the ghost and needs replacing. These instructions should cover most 1st generation S-series trucks. All pictures in this article where taken while doing the idler arm replacement on a GMC Syclone but the same procedure can be used on most all 1st generation S10, Sonoma, Jimmy, and Blazer too. The underside of your truck may vary slightly but the basics of the part and replacement are the same.
Removal of the Idler Arm
Jack up the front of the truck and place on jack stands. You'll need enough room to get your fat ass under there.
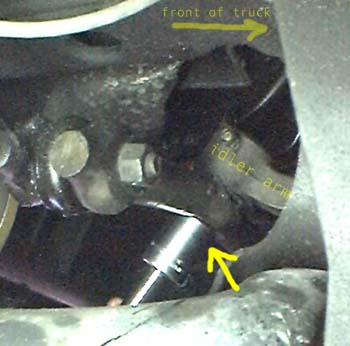
Next are the 2 (two) bolts that connect the idler arm to the frame. You'll need 2 (two) sockets/wrenches. One goes onto the bolt head that is accessible through the fender well (they are inside 2 holes in the frame). The other will be used on the nut side of the bolt which is above the front sway bar near the exhaust crossover tube. Remove the nuts, being very careful not to loose the bolts inside the frame, you may not ever see them again.

You can push the idler arm off the bolts, and out of the steering linkage. Take the whole thing out and toss it directly into the garbage like a boss.
Installing the Idler Arm
Screw the grease fittings into the new idler arm. The angled one goes on the thicker section, while the strait one goes into the section that joins to the steering linkage. If you didn't get a 90 degree fitting, go buy one, its required if you ever want to grease the idler arm properly.
Bolt up the frame bolts and then the steering linkage bolt, making sure to place the small spongy O-ring between the steering linkage and the idler arm. Line up the slots in the bolt with the hole in the idler arm so you can put the pin back through.
Go get an alignment as insurance just in case you knocked it out of alignment during the removal steps.
There are 0 Comments.
Say Something.You have to log in to comment...
We'll publish your comment after you're logged in.
Written by:syo237
Related HowTune Articles
Written by:iturgeon
Replace the Front Wheel Hub And Bearing
Written by:iturgeon
Removing the ABS
Written by:syo237
Changing the CV Axle
Written by:syo237
Replacing Metal Intercooler Lines
Written by:syo237
Replace the Window Clips
Get notified about new articles.
We don't sell or share your info.