Install An Aftermarket Stereo Head Unit on a Lotus Elise

Let's upgrade the stock Lotus Elise/Exige stereo head unit. Many people upgrade to get better sound, more volume, or added features like bluetooth audio streaming.
A few stats about the Blaupunkt Acapulco M54
- 18 watts RMS
- 50 watts Max
- 5 Channel Preamp Outputs
- Optional Aux Input (yea you can add a line in)
- Bluetooth: NO
- USB: NO
- Variable display colors
- MP3 Playback from CD-R and CD-RW
Upgrade Options
There's a ton of options for upgrading, the only limiting factor is that it's a single DIN unit and the dash above the unit will interfere with large fold out screens.
I mostly wanted to upgrade in order to gain bluetooth streaming from my Android phone and iPod, so my requirements were simple.
- No CD aka. "mechless" or "Digital Media Receiver" (CD's are dead)
- Bluetooth audio streaming
- Color changing display to be able to match the dash
- Better sound quality
- Something that looks good
I chose the Pioneer MVHX560BT shown in this article because it met all my needs and was recommended by a long time friend/high end stereo installer in Miami at Sonic Boom.
Some Head Units You May Like
- Pioneer MVHX560BT (Shown in article)
- Sony-MEXGS810BH
- Alpine CDE-HD149BT
- Alpine CDE-164BT
- Alpine CDE-153BT
- Stereo Puller Tools or a wire hanger and some cutters
- Tiny Screw Driver to re-pin the adapter
- Wire side cutters for striping and trimming the wire harness
- Wired Soldering Iron or a butane soldering iron for trouble free wire connections
Disconnect the Battery
Just to be safe, disconnect the battery to prevent any injury to yourself or any of the sensitive electronics you're messing around with.
Remove The Faceplate
The faceplate needs to be removed first. Fold the face down like you're going to insert a CD, and pull it strait out, starting on the right side of the unit.

Remove Head Unit
Blaupunkt requires a special tool to pull the head unit out of the dash. There a little one-way clips on the sides that allow it to slide in easily but prevent it from pulling out.
You need to use a tool to push the clips back in place and pull the head unit out. You can purchase one or make one from a coat hanger.
There are two small access holes on each side, the puller slides into these holes, down the side of the head unit, and presses the clips in.
Then you can carefully use them to pull the head unit out of the dash by sliding it forward.

Pull the head unit fully out of the dash and disconnect all the wires where they go into the back of the head unit. There will be at least 2 connectors, one for the speakers and power, and one for the radio antenna.
Remove the Stereo Cage
The cage around the stereo needs to be removed, as the stereo you bought comes with one designed for it.
The cages are held in by bending small tabs around the perimeter of the cage outward.
You'll need to use a flat head screw driver to unbend these tabs enough to slide the cage out.

Prepare Wire Adapter
Sony, Alpine, Eclipse, Kenwood, JVC and Pioneer wire colors match the colors on the Metra wire harness with one exception, the red (switched power) and yellow (constant power).
You have a choice to make, you can either solder red to yellow and yellow to red, OR re-pin the wires on the Metra adapter to keep colors matching.
I chose to swap the pins, I'll cover that later on.

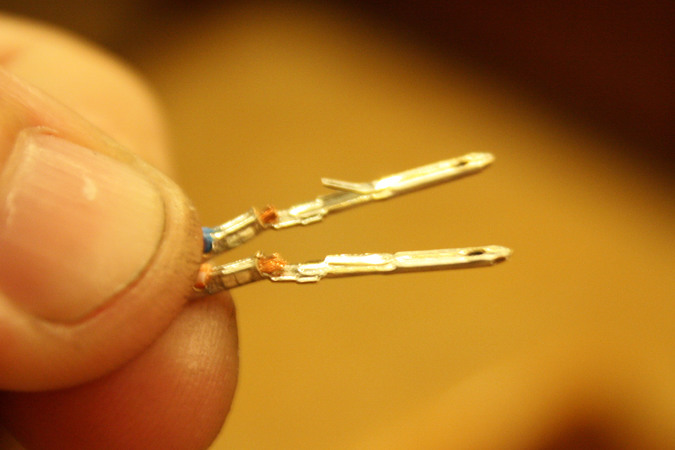
Re-pin the adapter
Swapping the Metra harness Pins: The pins swap super simple if you have a very small flat head screwdriver like the set linked in the tools list above.
If you look at the Metra adapter from the plug end, one side of each pin has a small slot in the plastic. If you insert a tiny flat head screwdriver next to the pin on the same side that has the tiny slot, it will flatten out a small retaining pin and allow you to pull out the pin.
So, insert a tiny screwdriver to flatten the pin, and pull the entire wire out of the connector.
To install, simply bend the pin back up, and re-insert where you want it.
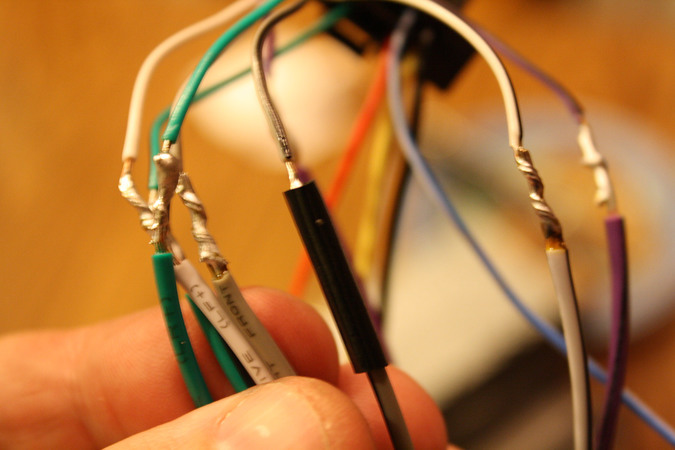
Solder the wires Harnesses Together
Trim, twist, solder, and shrink wrap the connections for each of the wires. This is probably the longest part of the process, but it's pretty simple.
You can use crimp connectors instead, but you might as well do it right.
Insert The New Cage
Slide the new stereo's cage into the dash and bend numerous tabs around the perimeter to keep it locked in place.

Route and Install any Accessories
My Pioneer unit has hands-free bluetooth phone functionality, which requires a microphone be wired and placed near the steering wheel or console.
If you wish to install a mic, you'll probably want to do a little research to determine exactly where you want to place it. You will probably want to disassemble some of steering column cowling to route your wires nicely.
This wasn't a functionality I cared about, so I chose to not install it. Honestly, the car is too loud to make talking on the phone a reasonable proposition.
The Pioneer unit also comes with a USB and line in connection on the back of the unit. I did wire both of these up and routed them into the driver's side pocket under the headlight and start button panel.
Connect The Wire Harnesses
Plug the antenna wire into the stereo. The Blaupunkt unit uses this little adapter on the end of the antenna wire that you may not need. The Pioneer I used did not need it.

Test the head unit BEFORE Sliding It In
With the unit plugged in but not locked into the dash, try it out to make sure all your wire connections are working.
Try the stereo with key on, key off, key back on. Make sure it keeps it's settings, and everything seems to work.
The backward wires in the harness above will appear to function if wired incorrectly, but the stereo will forget all it's settings with key off, so test it now.
Finish up and enjoy
Once everything works, slide the head unit all the way in, locking it in place.
Set your options, twist the knobs, play with the settings, and go for a nice cruise with some of your favorite tunes.

All together the install should only take an hour or two depending on how quick you are with a soldering iron, and how much stuff you remove to install your accessories.
There's a nice bonus from buying a mechless unit, it weighs a lot less. It's always nice when an upgrade adds lightness, it just feels like the Lotus way.
Head Unit Weights
- Stock Head Unit: 47.5oz.
- Pioneer MVHX560BT: 18.6oz.
I'll say this, it's really nice to not have to plug anything in on my drive. I used to wire my ipod into a line-in and keep it in my lap wrapped around the seat belt.
Now I just jump in, and it starts playing Spotify (or whatever) as soon as it connects. Nice.
There are 2 Comments.
Say Something.Elise has ISO 10487 connector and as far as I can tell the power pins are the correct way round: A4: battery, A7: accessory switch.
Looks like "Metra 70 1784" and "ISO 10487" are the same (?) Either way, I didn't need to swap the pins for my new JVC stereo (KD-X561DBT). It switches off with ignition switch as expected - and remebers the time when you switch it back on. Good article though.
You have to log in to comment...
We'll publish your comment after you're logged in.
Written by:iturgeon
Related HowTune Articles
Written by:iturgeon
Clean the MAF Sensor
Written by:iturgeon
Upgrading the Rear View Mirror
Written by:iturgeon
Remove Old 3M Paint Protection Film
Written by:iturgeon
Install Stainless Steel Braided Brake Lines on a Lotus Elise or Exige
Written by:iturgeon
Change the Steering Rack
Get notified about new articles.
We don't sell or share your info.