Replacing Accessory Belts on a Subaru Impreza

This article will guide you through the replacement of the Alternator/Power Steering belt and Air Conditioning belt for your STI.
Estimated Duration: 20 minutes
Difficulty Level: Novice
- Ratchet Set
- 10mm socket
- 12mm socket
- 12mm deep socket (optional)
- Short extension
- Air Conditioning Belt Gates K040353 or Gates blue racing belt K040353RB
- Alternator Belt Gates K050345 or Gates racing belt K050345RB
My AC belt starting squeaking/slipping after 72K miles. A closer inspection revealed both belts were cracking with age, glazed, brittle and needing replacement.
Remove the Air Intake

Remove the belt cover
Remove the 10mm bolt on the left and the 10mm nut on the far right.
Once these are removed, slip off the cover from the stud on the right side, then pull the cover up to free the alignment pin from the grommet underneath the cover.

Here I've removed the belt cover and placed it upside down to illustrate the bolt, nut, and alignment pin arrangements

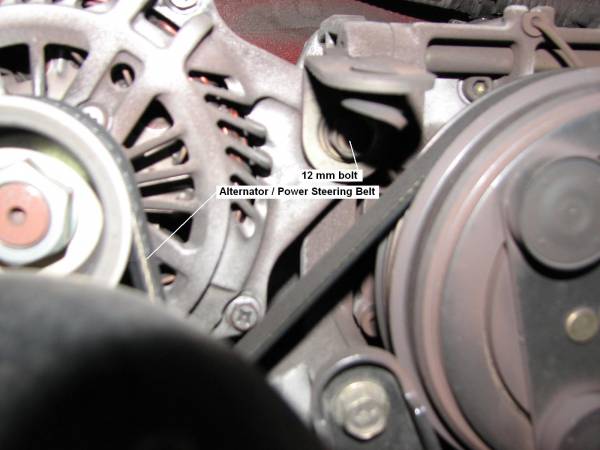
Removing the alternator / power steering belt
The alternator belt is the outer belt and must be removed first. Belt tension is maintained by three bolts.
Begin by loosening (do not remove) the 12mm alternator swivel bolt
Next loosen (do not remove) the 12mm lock-down bolt.
Finally loosen the 12mm belt tension bolt. As you do so, you'll notice the belt now getting looser - keep going until you can work the belt off the alternator pulley and remove.


Remove the A/C Belt
Once the alternator belt has been removed, we can now remove the A/C belt. Begin by loosening (do not remove) the 12mm idler wheel tension lock-down bolt, labeled on the lower right side of this image.

Then loosen the 12mm belt tension adjustment bolt until the belt can be removed from the A/C pulley.

Install the new belts
Install the new belts and adjust the bolts in reverse order. The image illustrates the part numbers I used from O'Reilly's Auto - your part numbers may differ.
Tighten the tension adjustment bolts until there's only about 1/4" play at the center span of each belt with moderate finger tension. Once you're satisfied with the belt tension, tighten each of the lock-down bolts (a bit of caution here - excessive belt tension may wear pulley bearings prematurely - observe the 1/4" of center span play guide).
Before re-installing the belt and air intake covers, start the car and look for any issues with the new belts (keeping fingers well away from the new belts). Turn on your A/C to test that belt. If no squeaking or excessive belt play is observed then shut off the motor and re-install the belt and air intake covers.
Look around the engine compartment for any remaining tools, drop the hood and enjoy the ride.

There are 2 Comments.
Say Something.This is very nice and really appreciating.
You are Wonderful,
I have looked for two days for this information - and it had to look exactly like my '05 Subaru WRX Impreza; 58,422 miles. Your pictures and explanations were clearly defined. I tried to remove the wrong bolt in the middle of the belt cover. I'm 5' female and want to do this despite the offers. I fear any task only until I find someone who teaches me the knowledge.
Thank you very, very much. Happy Holidays.
You have to log in to comment...
We'll publish your comment after you're logged in.
Written by:RobT
Related HowTune Articles
Written by:RobT
Replace the Cabin Filter
Written by:RobT
Repair the Whining Steering Pump
Written by:iturgeon
Replace the Front Parking Light Bulbs
Written by:RobT
Replace the Brake Light Bulb
Written by:iturgeon
Remove the Top Mount Intercooler
Get notified about new articles.
We don't sell or share your info.