Replace The Thermostat on a 2005 to 2010 Mustang GT

First, the bad news: The reason why your car is overheating can be difficult to diagnose. There are so many parts and systems that can cause the problem, and finding the culprit can mean throwing money down the drain, hoping youre fixing the cause.
Now, the good news: Were here to help you find out exactly whats causing your car to overheat, minus a giant hole burnt in your wallet. Well tell you where to start looking and what exactly to keep an eye on, so youre not fixing stuff that isnt broken. Each article will focus on the major reasons why your car might be overheating, and well even provide illustrated steps on how to diagnose and fix the problems.
In these article were going to use a popular performance vehicle as our testbed, a 2006 Mustang GT. The car pictured in our articles has seen plenty of highway miles, lots of stop-and-go traffic, and its temperature gauge has nearly pegged the red before. Its owner threw a lot of money at possible overheating causes without knowing what he was looking for. Were going to use those learning experiences to help you avoid tearing your hair out and spending money needlessly.
Part 1: The Most Common Cause of Overheating (A Broken Thermostat)
Inside your S197 GTs coolant system is a small thermostat. This device acts as a mechanical valve that regulates the flow of coolant, opening and closing to help coolant temperatures go up and down. When your thermostat fails, it may get stuck in the closed position and itll fail to open when your coolant needs to flow freely in order to reduce temperatures. A stuck or broken thermostat will result in poor flow of fresh coolant to your engine block and itll quickly have you pulling over with steam forcing itself out of your radiator or a coolant line. If your Mustang has any number of miles on it and youre overheating, we automatically recommend replacing your thermostat. Theyre cheap, simple little mechanisms that are operated by a heat-sensitive spring, and they can fail pretty often. Thermostats do not operate on exact science, so even a worn thermostat thats operating marginally can still cause overheating symptoms.
- Flathead Screwdriver
- 5/16th Socket
- Socket Wrench
- Large Pliers
- 14.2 Quarts of 50/50 Coolant/Water
- Engine Coolant Thermostat Gasket, Ford Part #8255 (RG-571)
- Engine Coolant Thermostat, Ford Part #8575 (RT-1168)
Drain Your Coolant System
Do this by removing your radiator cap, then locating the drain plug on the bottom left corner of the radiator and removing it. The nut is tucked up above the undercarriages splash guard, and can be accessed through a small hole in the guard. The OEM plug is yellow and may be fragile, so take care when twisting it. If it is difficult to twist by hand, use the large pliers to twist it.


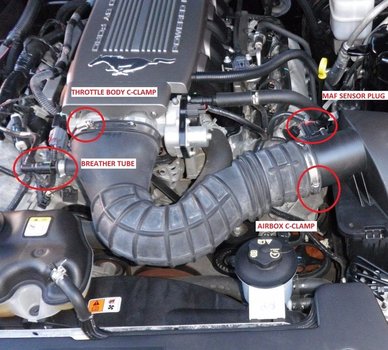
Remove the Factory Air Intake Tube
Do this by locating the c-clamps on the throttle body and airbox. Loosen the c-clamp nuts with a flathead screwdriver. Disconnect the breather tube feeding into the passenger side of the intake tube by pressing on the green ring and pulling gently. Disconnect the MAF sensor plug from the air tube as well. Once the clamps are loosened and the breather tube and MAF sensor plug are unplugged, pull the air tube off the airbox and throttle body.
Unscrew Your Power Steering Reservoir
The reservoir is attached to the radiators electric fan housing with one bolt. Simply un-bolt it using the 5/16th socket and socket wrench so it can be shifted out of the way, in the direction of the arrow illustrated below. We recommend tucking it up against the airbox and metal lines. The attached power steering fluid lines are flexible, and theyll stop the reservoir from falling down.

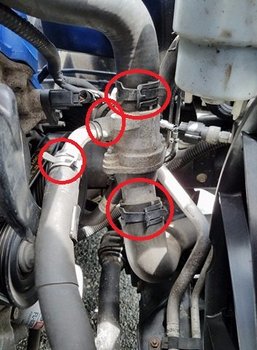
Locate the Thermostat Housing
Its situated on the drivers side of the motor, just in front of and below the valve cover, and has 4 coolant lines connected to it. There are two ways to get to your thermostat: (1) Unclamp the coolant hoses from the housing and remove the housing from the engine bay, or (2) simply unscrew the housings top and bottom halves while it stays connected to the lines. We found the smallest coolant line can be removed next to the block can be removed and the bottom and top halves of the housing pulled apart to expose the thermostat pretty easily. You shouldnt have to remove the housing entirely unless its damaged and needs replacement.
Remove the Thermostat From the Housing
So do by unscrewing the two screws holding the housing together using the 5/16th socket and socket wrench. The screw heads are inverted on the bottom half of the housing, facing down. Take note of the way the thermostat is positioned inside the housing when removing it, as well as the rubber o-ring that seals it inside the housing. Putting either the o-ring or the thermostat back in facing the wrong direction down will cause the unit to operate incorrectly, contributing to your existing overheating issues.
Test Your New Thermostat
For peace of mind, test your new thermostat before installing it often, a new thermostat can ship dead on arrival and it won't function. Installing it without testing it first means you cant be sure that youve eliminated the thermostat from the list of potential causes of overheating.
To test the thermostat, suspend it in a pot of hot water on the stovetop. Monitor the water temperature until it reaches 195 degrees - this is the temperature that the thermostat should open. If it doesn't open, it's not functional. If it does, you know it'll function as intended once installed.

Install Your New Thermostat and O-Ring
Install your new thermostat and o-ring. Place both back inside the housing in the same orientation you took them out. Bolt your thermostat housing back together, and connect any hoses you disconnected before removal.
Re-Fill your Coolant System
Fill your radiator and coolant reservoir with new coolant. Your coolant should be a 50/50 mix of coolant solution and distilled water. The OEM coolant system calls for 14.2 quarts of mixture.
Do not use tap water! Use only distilled water.
Using non-distilled water will cause a build-up of corrosive material in your radiator, coolant lines, and engine block. These corrosive compounds can eat away the coolant passages in your engine, and they could even cause premature wear of your head gaskets. They will cause build-up in your radiator which will reduce coolant efficiency and cause the need for a new radiator.
Burp Your Coolant System
Burping your system is critical. When you empty and re-fill your coolant, air bubbles get trapped in the system. These air bubbles can cause temperature sensors to read incorrectly, giving false overheating readings. Even worse, air bubbles reduce the efficiency of your coolant system and can cause actual overheating if left in the system.
Position your vehicle on an incline so the radiator and cap are elevated (air bubbles want to travel upward). Run your engine for approximately 10 minutes with the radiator cap off. Turn your vehicles cabin heat to full blast. This will cause your heater core to cycle coolant which will aid in ridding your system of air bubbles. Your coolant level should go down as air is released, so you may need to top it off to the appropriate measurement line on the coolant reservoir.
Test Drive!
Operate your vehicle in normal conditions, monitoring your temperature gauge for fluctuations. Even after burping your system, some air may be trapped in the system which will only be released once driving and putting an actual load on your motor, so one or two quick spikes in temperature should not be alarming.
Let your vehicle idle after driving and try to replicate the conditions in which it showed signs of overheating. Most overheating symptoms end with a new thermostat. If thats the case for you, congratulations! If overheating symptoms persist, do not fear well help you get to the bottom of it.
If Your Car Still Overheats...
Dont fret! Take a read of our next upcoming article: Diagnosing a Faulty Radiator and Electric Fan. Well go over inspecting your radiator and electric fan assembly for proper cooling. Well help you determine whether either (or both) units may be at fault for your vehicles persistent overheating issues.
There are 0 Comments.
Say Something.You have to log in to comment...
We'll publish your comment after you're logged in.
Written by:Travis Noonan
Related HowTune Articles
Written by:iturgeon
Change the Oil
Written by:syo237
Replace the Door Handle
Written by:iturgeon
Replace the Front Brake Pads
Written by:cpeterson
Change the Oil
Written by:iturgeon
Change the Cabin Air Filter
Get notified about new articles.
We don't sell or share your info.