Change The Motor Oil And Filter on a Subaru Impreza WRX STI
This guide will illustrate an oil and filter change for a 2005 STI, but should apply to similar Subbie's. A general rule-of-thumb is to change the oil and filter every 3000 miles. I use full synthetic oil and typically go 4000 miles.
After 86K, the car seems to be content with this interval.
- Required:
- Ratchet set or equivalent box wrenches
- 17mm socket
- 12 mm deep socket or Phillips screwdriver
- Flat Screwdriver
- Oil catch basin
- Hydraulic Jack and Jack Stands; Rhino Ramps; or lift
- Recommended:
- 4.2 quarts (4.0 liters) of 5W-30 Oil (choose one)
- Oil Filter (choose one)
- New Crush Washer
Raise the Car
After collecting the necessary tools and replacement parts, jack, drive, or lift the car to provide adequate access to perform the oil change.
If using a jack, always use jack stands as the jack could fail
If using a ramp, always use wheel chocks to prevent the car from rolling back
Jack or Lift points for a two-post lift are illustrated below and further indicated by notches in the frame seam. Consult your owners manual for additional illustrations as needed.
The front plastic air dam must be removed for access to the oil filter:
- Using the 12mm deep socket or Phillips screwdriver, remove the 3 front and 2 rear bolts at locations {A}
- If you have a grommet removal tool, I find it best to start with the slotted screwdriver to back the grommet off, then finish with the grommet removal tool. This approach minimizes damage to the plastic grommets, especially as they age and get brittle.
With the bolts and grommets removed, take hold of the air dam and lift it slightly up and to the rear of the car to slide it off its two mounting hooks.
Note from the first picture in Step 3 that the oil drain bolt is accessible with the air dam in place. If you put a premium on efficiency and don't mind altering the car a bit, you may decide to cut an access hole in the air dam to the oil filter. This would allow you to skip the air dam removal/install for future oil changes.
Situate the oil catch basin under the drain plug and remove the 17mm drain plug at location {A}. Latex or other disposal gloves and a wipe rag or paper towel are recommended. Loosen the drain plug with the wrench, then back it out by hand to keep the plug from falling into the catch basin.
If your basin is large enough to cover both areas, allow the oil pan to continue draining and remove the oil filter at location {B}. A filter wrench may be required to loosen it.
Inspect the drain plug and wipe clean to remove any metallic residue. Subaru recommends replacing the crush washer with each use. I've had no issues re-using them 1 or 2 times, however. If you do replace the washer, take note of the orientation - though it's not critical, the preferred orientation is with the crush side placed up against the pan. Once the oil is finished draining replace the drain plug and tighten.
I prefer to fill the new oil filter before install. I believe it helps ensure good flow on first start up with the new oil. Also spread a light coat of oil over the rubber gasket of the filter to help it seal. Install the new filter and hand-tighten as much as you can. I usually add one additional quarter-turn with the filter wrench just to be sure - but don't over do it.
With the drain plug and filter secured, replace the air dam by aligning the two slide hooks into the front frame area. I find it helps to note the location of the two rear bolt holes for alignment as well. With the air dam hanging from it's hooks, insert the 4 plastic grommets and 5 retaining bolts and tighten.
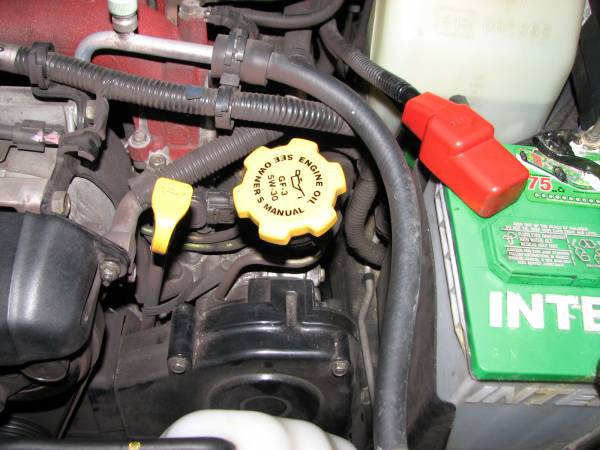
With the air dam in place, lower the car and raise the hood to gain access to the oil filler cap {A} and oil dip stick {B}.
The car requires 4.2 quarts of oil. I use the following procedure to help prevent overfilling: When using a 5-quart container, I like to mark it for 4.2 quarts before I start pouring. I stop pouring at 4 quarts, replace the oil filler cap, start the car and run for a minute. Then stop the car and check the level on the dip stick. If more oil is needed, I repeat the process.
Replace the oil filler cap and oil dip stick, lower hood, and update your maintenance records for the oil and filter change.


There are 0 Comments.
Say Something.You have to log in to comment...
We'll publish your comment after you're logged in.
Written by:RobT
Related HowTune Articles
Written by:iturgeon
Subaru Lights Stay On And Won't Turn Off
Written by:RobT
Replace the Brake Light Bulb
Written by:RobT
Replacing Struts
Written by:RobT
Repair the Whining Steering Pump
Written by:RobT
Replace the Cabin Filter
Get notified about new articles.
We don't sell or share your info.