Changing Plugs, Wires, Cap And Rotor on a GMC Syclone / Typhoon
The GMC Syclone and Typhoon are particularly hard on ignition parts, so get used to replacing them regularly. This article will cover the basics and give you a few tips that'll make the job easier.
- 3/8" Wobble Spark Plug Socket
- 3/8" Ratchet and a few extensions and 1/2" and 9/16" sockets.
- 3/8" Torque Wrench
- Spark Plug Gapper
- 6 Spark Plugs OEM Delco CR42TS, NGK UR6 (recommended), and NGK TR6 for Vortec Heads
- MSD Cap and Rotor
- Taylor Spark Plug Wires
- Dielectric Grease
- Spark Plug Protector Sleeves
As the ignition wears down, the truck will begin to run a little rougher till eventually it will begin to break up under boost. Worn ignition components can easily cause the computer to increase knock retard timing. Usually this is the first place to start with drivability on the turbo 4.3.
Jack Up The Truck
The plugs are pretty difficult to reach, especially if you have a very stock truck. You'll need to remove the wheel wells gain access to the plugs and wires. Begin by getting the front wheels off the ground. Make sure to sit the truck on a pair of jack stands.
Remove Wheel Wells
If you have a stock set of wheels, you should be able to remove the wheel wells without removing the wheels (it takes a little careful work, but you can squeeze them past the cladding around the tires).
If this is your first plug change, I'd recommend removing the wheels too.
Remove the Plug Wires
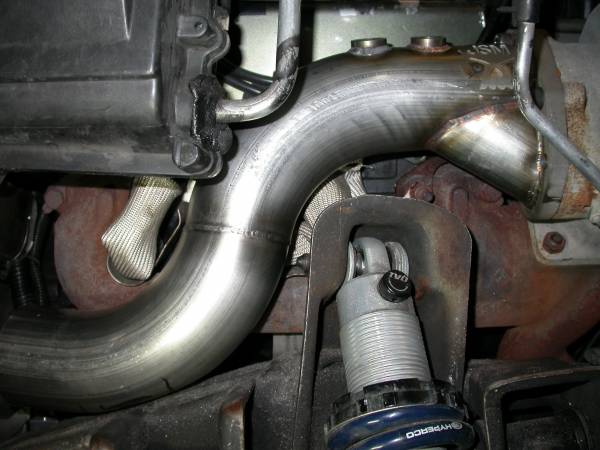
Locate the plug wires where they connect to the spark plug. Cut any zip ties and remove any retainers keeping them in place. You'll need your wobble socket on cylinder #3 and possibly a few other cylinders depending on your modifications.
3 inch downpipes can make this job a little harder.
Pull the plug wires off each plug and start pulling the wires out of the truck. Work them loose and disconnect the other end from the distributor cap.
Remove Spark Plugs
Each plug is a little different, with the most difficult being on cylinder 3 behind the steering arm. You'll need the integrated wobble spark plug socket shown in the tools list above for that one.
Just take your time and pull out each plug.

Remove the Distributor Cap
The cap is held on by 2 little screws near the base on opposite sides. Loosen them and it pulls straight off.

Remove the Distributor Rotor
The rotor pulls strait off the distributor. You may not believe me after you've yanked on it for a while, but it will pop off, usually resulting in you punching the hood and cutting your hand somehow.
You may find it easier to pry the rotor off using the angled flat end of your center cap key. (it's the only use I can find for that thing)
It's ok to destroy this thing removing it.

Install a New Cap and Rotor
Slip a new rotor onto the distributor. Make sure it is seated all the way down. Align the notch in it with the distributor and press down forcefully.

Place the new distributor cap over the distributor. It fits a little loosely, but really can only be installed in one place. Make sure the base is flat, and the screws line up before you tighten them down. When it's tight it should not wiggle at all.
Tip: I always write the cylinder numbers on the top of the cap so to make installation easier.

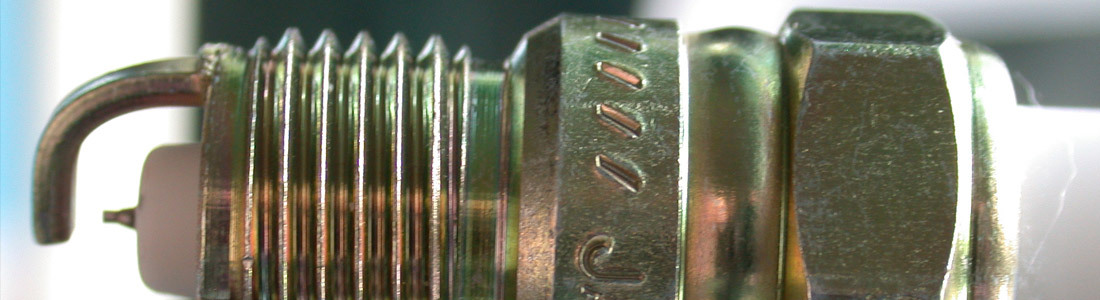
Install the new Spark Plugs
Set the electrode gap on your new plugs.
Stock spark plug gap is 0.035, but the community recommends 0.028-0.025.
Apply anti-seize to the new spark plug threads. This is not critical, but it should make removing them pain free.
Most of the plugs are pretty easy, even if they are a little difficult to reach.
A trick I learned long ago was to use a hose on the end of the plug to aid installation. It makes spinning them down easier AND the loose grip between the plug and hose will help prevent you from cross-threading the plug by applying too much force. I promise it's worth trying.
Pictured below is me using this trick on my Mazda 3.

Torque the plugs to 11 - 18 ft-lbs.
As it turns out spark plug torque is important: "Torque is one of the most critical aspects of spark plug installation. Torque directly affects the spark plugs' ability to transfer heat out of the combustion chamber. A spark plug that is under-torqued will not be fully seated on the cylinder head, hence heat transfer will be slowed. This will tend to elevate combustion chamber temperatures to unsafe levels, and pre-ignition and detonation will usually follow. Serious engine damage is not far behind." via NGK
Now install the Plug Wires
Install each wire, one at a time starting with the longest wire for cylinder #1
Take note of the lengths and different boot end angles. The longest wires reach out to the furthest cylinders and the different angles are to avoid various exhaust and steering parts.
Typically the boots are as follows, but may differ from brand to brand:
- Straight boot
- 90 degree
- 90 degree
- 90 degree
- 90 degree
- 45 degree
All of the wires use a 90 degree bend on the distributor end.

Route each wire using the existing retainers to keep them as far away from the exhaust as is reasonable. Use additional zip ties to keep the wires in place as needed. Make sure you avoid any sharp edges, and above all, any direct contact with the exhaust manifolds and downpipe.
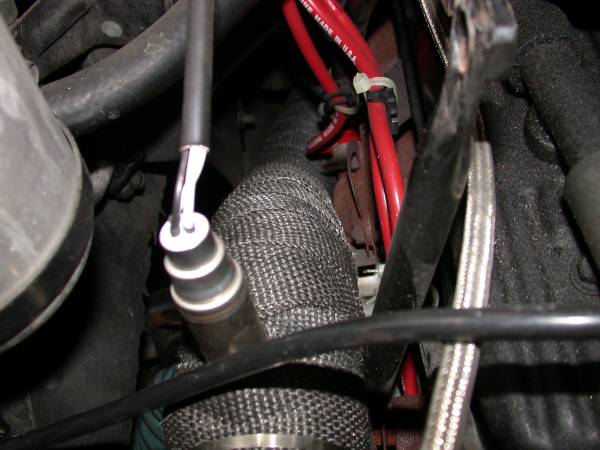
If you bought fiberglass heat sleeves, slip them over the wire boots at the ends where they connect to the spark plugs.
I've had great experiences with these sleeves extending the life of my ignition components significantly. I highly recommend them.

Each wire will snap down onto the plug terminal. Make sure you fully seat the wire onto the terminal. I usually press quite firmly on the boot to make sure it's snapped down.
If you use dielectric grease do not apply it to the terminals. Dielectric grease is a non-conductor of direct electrical current. It's purpose is to grease the boot, NOT the electrical contact points. Use a very small amount on the walls of the boot and on the ceramic portion of the plug only. Don't use it at all on terminals, the cap or your ignition coil. Check out this video covering dielectric grease usage


Test The New Ignition Components
Install Fender Wells and Wheels
The fender wells are a pain to put back on unless you use this simple tip: Don't tighten any of the bolts till all the bolts are in. You'll need to push and pull the fenderwell around to get all the holes to line up.
There are 0 Comments.
Say Something.You have to log in to comment...
We'll publish your comment after you're logged in.
Written by:iturgeon
Related HowTune Articles
Written by:iturgeon
Installing Lowering Blocks
Written by:iturgeon
Replace the Wiper Blades
Written by:iturgeon
Install the Velosyty Chip from TurboTweak
Written by:iturgeon
Port Matching the Turbo
Written by:syo237
Replacing Metal Intercooler Lines
Get notified about new articles.
We don't sell or share your info.