Install The Velosyty Chip From Turbo Tweak on a GMC Syclone & Typhoon

Learn how to instal a new chip in any GMC Syclone or Typhoon. This guide shows how to install the TurboTweak chip specifically, but you can use the guide to install any chip into the stock syty ECM.
The TurboTweak chip is a piggyback style chip that uses the original memcal for some of it's built-in circuits. It's a modern chip with tons of settings. Arguably the best chip out there at the moment.
Any time you get into chipping, I'd highly recommend a scan tool with logging that can log, and a wideband O2 sensor.
- 7mm socket
- Stubby flat head screw driver
- philips head screwdriver
- TurboTweak Velosyty Chip
- 2 Extra ECM pins (if you're connecting a wideband oxygen sensor)
Disconnect the Battery
Removing the Negative or Ground cable first. Learn more about disconnecting a battery.
Accessing the ECM
Remove the passenger side bottom dash trim panel.
Remove the 5 x 7mm hex (or a stubby flat screwdriver) screws along the bottom lip.

Remove the ECM retaining screw. It's the one holding the gold colored bracket onto the lip of the dash.

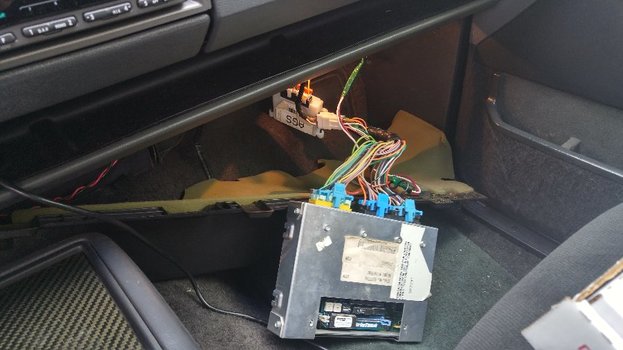
Carefully pull the ecm down.
Wiggle and pull the ecm down out of the dash. It's attached to the gold colored metal bracket and has the speed sensor box attached to it too.
Below, the ecm assembly is is shown dis-assembled without the bracket and chip cover.
Optional Wide Band Oxygen Sensor Install
If you have a wideband O2 sensor, the Velosyty chip can be programed to use your more accurate wideband for it's calculations. This is a highly recommended addition.
As of June 2016, the list of supported wideband oxygen sensors are:
- PLX (All - including the SM-AFR)
- AEM Gauge Type UEGO (30-4100, 30-4110)
- AEM Inline Wideband UEGO 30-2310)
- AEM Failsafe Wideband Gauge 30-4900
- Innovate (All)
- NGK Powerdex AFX
- Possibly others at request
I have a PLX SM-AFR, so I ordered a PLX compatabile chip and used the wiring guide from this PLX Wideband o2 wire guide to install it.
OPTIONAL Wideband O2 - Install the analog 0-5V wideband output from your aftermarket O2 sensor into the unused F14 pin on the back of the ecm.
This pin is normally empty, it's 3rd from the right hole on the top row of the connector with grey plastic shown on the left below.

To do this correctly you'll need an connector pin that will insert into the ECM wire harness and connect to the ecm. We had a few junkyard syty/sunbird ecms with the whole harness to reuse for ours.
If you have a source for these pins, PLEASE add them in the comment!

OPTIONAL Wideband O2 - Connect the wideband ground to the ECM on pin B9.
B9 is normally empty. It's located in the center connector. As shown below, it's 4 pins from the right on the top row of the connector with blue plastic.

Installing the New Chip

Remove the stock chip.
There are 2 hinged clips, one at each end. Release them by pressing them outward, away from the chip.
Remove the blue cover from the stock Memcal.
A small flat head screwdriver can be used to pull the clips on either side up enough to remove the cover. This has to come off so the chip will fit inside the ECM.

Install the stock chip on the top of new Velosyty chip.
The circuit board looking side (thats actually the components for the knock sensor) will go on the right most side of the pins.

Careful not to press down on the bare components of the chip. Bending or breaking any of the legs is bad news.
Slide the newly combined chips into the ECM and seat the Velosyty chip onto the pins in the ECM.
Start by sliding the top with the original ecm into the case first. Then rotate the bottom down and align the connector with the pins on the ECM. Once it's all lined up and fully seated, clip the chip retainers back into the closed position.

Testing and Initial Setup
You'll probably want to leave the ecm hanging from the dash while you dial in the settings on the chip.
Initial fuel pressure should be set to 43psi (with the vacuum line off the regulator).
It's possible to relocate the whole ECM into the glove box for easy access to the chip.
Turn the key to 'On' position to power up the ecm.
The Check Engine light should come on, blink once, and stay on. If it flashes repeatedly, do not start. Recheck the pins and memcal adapter.
If the light still flashes, the manual says the chip may be defective or damaged. You definitely should not have a Check Engine light when the engine is running.
Start the truck.
On the first start, idle may flare up or it may stall. If it does, turn the ignition off and wait 5 seconds to restart. It should idle normal after this.
Warm up the engine to 160 degrees and drive around for about 15 minutes.
The ECM needs some time to re-learn for it to run well. Avoid WOT / heavy boost unless you have a scan tool to monitor.
The Velosyty chip includes a knock alert feature that flashes the check engine light when knock retard exceeds 5 degrees. If you see it flashing at Wide Open Throttle, take it easy on the throttle and diagnose the cause of the knock before something bad happens.
Connect a scan tool and verify all the sensors are reading in the correct ranges.
- IAC/Idle Air Control: 25-35 (warmed up in park)
- TPS/Throttle Position Sensor: .60-.90 volts (throttle closed)
- MAP/Manifold Absolute Pressure: 30-40 kPa (at idle)
The manual says these starting points are crucial to the Velosyty chip!
Adjust the chip's settings.
One of the greatest things about this chip is the built in adjustment settings within the chip. Generally it's set up pretty safe and reliable from the get go, you can dial it in further by adjusting the various settings.
Read more in the next article that covers tuning the TurboTweak Velosyty chip
There are 2 Comments.
Say Something.AUVECO #14883 ECM PINS
I HAVE SOME ECM CONNECTORS AUVECO # 14883
You have to log in to comment...
We'll publish your comment after you're logged in.
Written by:iturgeon
Related HowTune Articles
Written by:syo237
How to Adjust the TV Cable
Written by:iturgeon
Tuning the TurboTweak Velosyty Chip
Written by:syo237
Removing the Truck Bed
Written by:iturgeon
Repair the Broken Plastic Cladding Tabs
Written by:iturgeon
Replace the Ball Joints
Get notified about new articles.
We don't sell or share your info.