Replacing Vacuum Hoses on a GMC Syclone

Vacuum hoses on the GMC Syclone and Typhoon are not only unique to these vehicles, but very brittle and aging quickly.
Years ago, mine we're starting to deteriorate so badly that I decided to replace them, and write up instructions on how to do so. That work turned into the original SyTyArchive's Silicone Vacuum Hose kits that Sportsmachines sells today.
These kits are pretty easy to install once you have the right parts. Many people find it much easier to buy a kit, but you could gather the parts yourself. Though, it's very hard to find top-quality parts in small quantities (I learned a lot about glass-filled nylon, check valve diaphragms, and silicone hose).
Let's just say that all silicone hose is NOT equal, theres some real junk out there.
- Cutting Pliers
- Various Sockets: 1/2", 9/16", 10mm
When the vacuum hoses leak, all sorts of strange things start to happen. They can affect engine performance, efficiency, turbo boost, cruise control operation, emissions controls (gas fumes), and various HVAC and air conditioning functions.
A common problem with SyTy's are that the air never blows out the top dash vents. This is typically due to a large leak or a bad check valve that prevents vacuum from opening the little trap door that directs air to those vents.
Disconnect the Battery
Proper precautions you know - besides, if you have a stock battery, you'll be replacing the vacuum hose that goes under the batter tray. Go ahead and disconnect the leads to the battery.
Remove the Main Vacuum Harness
Start at the front of the intake manifold. The main harness starts here and routes toward the passenger side. Look just above the thermostat housing, below the throttle linkage. There should be a large brass fitting, just remove the rubber line from the fitting.


Disconnect the vacuum line that connects to the vacuum reservoir ball. The vacuum ball is normally located under the battery tray. If your's is still there, remove the battery, and battery tray. There should be 4 or 5 bolts that hold the battery tray in.

Disconnect the vacuum line that connects to the HVAC controls. It's located at the rear of the engine bay near the center of the firewall. Just slip the rubber line off the harder plastic one.
Remove the MAP/Fuel Pressure Regulator Harness.
There is another separate harness at the rear of the intake manifold. The vacuum source is a brass fitting screwed into the upper intake near the firewall. It points down toward the ground, remove the vacuum hoses from this fitting.

Disconnect the vacuum line on the fuel pressure regulator, a few inches away to the passenger side.

Disconnect the vacuum line on the MAP sensor. The sensor is a smooth, flat, rectangular black box mounted on a bracket above the driver's side valve cover. It clips into a plastic retainer, just pull it out and disconnect the vacuum hose that connects to the bottom of the sensor.

Remove the Charcoal Canister Harness
The charcoal canister uses engine vacuum to suck up fumes captured by the charcoal. Disconnect the line where it connects to the bottom of the throttle body (it points downward).
The other end of the vacuum harness goes to the charcoal canister below the driver's side headlight. You may have to remove your stock intake cross-over tube if you still have one. Remember to be VERY careful with the intake tube's ends, they tend to crack from over-tightening. Remove this line that connects the canister to the throttle body. Leaving the other line that connects to the charcoal canister in place.
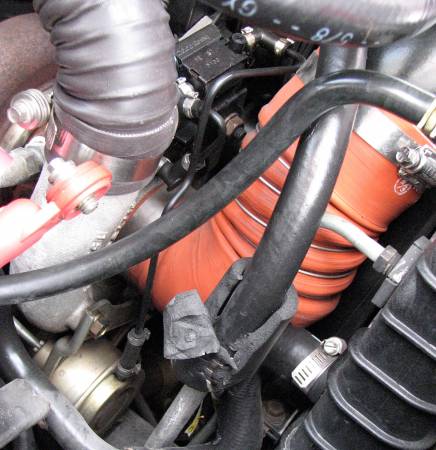
Turbo Harness

Install Main Harness
Start by laying the harness out so it's oriented like it will be when it goes into the truck. The cruise control and egr lines go off to the right, long single vacuum ball line off to the left.

Connect the cruise control line. I routed the line around the back of the fuel pressure regulator.
Connect the EGR Solenoid, running the vacuum line between the distributor cap and the intake manifold. It attaches to the outer most nipple on the Solenoid (driver's side).
Connect the long line running to the vacuum ball. Run it behind the intercooler, into the front most opening in the fender. Then down, and back out the bottom most opening in the fender.
Install MAP/EGR Harness
Attach the shortest leg of this 'T' harness to the brass fitting at the rear of the intake manifold.

Charcoal Canister Harness

Run the line up, behind the air box, over the valve cover, between the intake manifold and the pulleys. Remember to keep it away from the serpentine belt.


Turbo Harness
The shortest line in the kit connects the top-most nipple on the driver's side of the boost solenoid (aka wastegate solenoid). The bottom nipple is a vent, and doesn't connect to anything.
This line may need to be trimmed to keep it from hitting the serpentine belt, trim a tiny bit at a time to make sure it doesn't bend so tight that it kinks.

Zip Tie Everything.
Now go back and put a zip tie on every connection. Make sure to get the tie in the right place on the barb to keep it from backing off.
There are 0 Comments.
Say Something.You have to log in to comment...
We'll publish your comment after you're logged in.
Written by:iturgeon
Related HowTune Articles
Written by:iturgeon
Replace the Ball Joints
Written by:iturgeon
Using the GM Top End Cleaner
Written by:syo237
Replace the Lumbar Support Hose
Written by:iturgeon
Relocate the ECM to the Glovebox
Written by:syo237
Finding the Vacuum Leak
Get notified about new articles.
We don't sell or share your info.