Repair The Accessory Belt on a Toyota GT-86 or Subaru BRZ
This belt replacement guide covers the type FA20 engine found on the Toyota GT-86, Subaru BRZ and the Scion FR-S.
First of all, determine if you need a new serpentine belt. Rotting belts, large cracks and missing ribs are telltale signs that you need to replace the belt as soon as possible. If the ribbed parts are more or less intact, then there is still some life left to them. Ribbed belts offer more surface area than traditional belts, so a few small cracks or missing sections in separate areas dont mean that you have to change your belt immediately. Manufacturers have designed these belts to last from 60,000 to 100,000 miles, so these should last years if you bought your car new. A noisy belt does not necessarily mean a worn belt. Another cause of a noisy belt is a worn tensioner, so double check if youve got a noisy belt and visual inspection of the serpentine belt reveals no cracks or missing ribs.
- OEM Serpentine belt (pick one): Bando 6PK2070 Continental 4060815, Gates K060815, Gates Racing K060815RB, or Dayco 5060815
- (Optional) Serpentine belts for Superchargers: Innovative:GATES K061015RB, Vortech:GATES K060975RB
Disassembly and Installation
You will have to remove the intake duct and airbox to be able to remove and install the serpentine belt. Begin by removing the airflow sensor connector.
The airflow sensor connector is a black electrical plug located between the airbox (the rectangular black plastic box) and the 90-degree flexible hose. The plug is held in place by a locking holder. Hold the plug from the rear, ensuring that you depress the plastic lever-like locks. If it doesnt come off easily, try using a rocking motion to loosen the plug, all the while depressing the lock on the plug.
Loosen the hose clamp connecting the airbox and 90-degree hose and remove the 3 10mm bolts holding the airbox. There are 2 in front and one in rear. The rear one is on the right of the airbox. You can now remove the airbox.
You will next need to remove the hose connected to the throttle body, as well as the noise generator hose. Loosen the clamps using a flat-bladed screwdriver and remove the hose. Your cars serpentine belt is now accessible.
Next, remove the plastic guards covering the alternator and power steering pump. Each guard is held in place by two 10mm bolts.
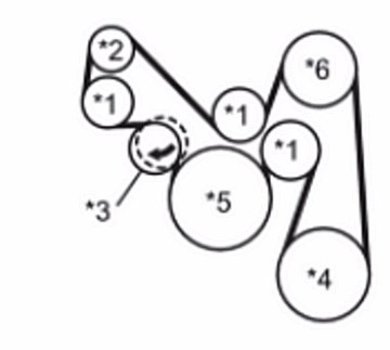
Study how the serpentine belt is looped around the various pulleys. Better yet, take a picture with your phone to make a record of the positioning. Below and to the right of the alternator is the tensioner pulley. Using a 12mm socket, loosen the bolt to this pulley and move it so that the serpentine belt becomes loose.
Remove the old belt and install the new one. Take extra care in ensuring that the belt has been routed properly through the various pulleys. Double check that the ribs on the belt are seated properly on the pulley grooves.
Use the ratchet with a 12mm socket attached to retighten the bolt holding the tensioner. Double check that the belt isnt loose. Reinstall the guards, hose, and airbox.
Start the engine, check the dash lights, listen for strange noises. If everything looks/sounds normal, youre done!


There are 1 Comments.
Say Something.The tensioner uses a 14mm bolt, NOT a 12mm; and removing all of the intake hardware is COMPLETELY UNNECESSARY. All you have to remove are the two lasting pulley guards. I recommend getting a plastic tire tool like the ones used for replacing bicycle tires, they are a great help in getting the belt onto the final pulley without marking up the metal or damaging the new belt. MUCH better than using a metal screwdriver. And finally, get help! Four hands are waaay better than two! One person helping during the initial routing; and then one person dedicated to holding the tensioner pulley back during the final part of the install.
You have to log in to comment...
We'll publish your comment after you're logged in.
Written by:CSL
Related HowTune Articles
Written by:iturgeon
Replace the Wheel Studs
Written by:iturgeon
Replace the Broken Sun Visor Mount
Written by:BagOfArms
Replace the Manual Transmission Fluid
Written by:BagOfArms
Replacing Side Markers
Written by:iturgeon
Install Bosch Icon Wiper Blades
Get notified about new articles.
We don't sell or share your info.