Changing The Oil on a Chevrolet Camaro
The 3.6L direct injection V6 LFX engine was first introduced in 2012 in the Chevy Camaro as a replacement of the LLT motor. A redesigned cylinder head, integrated exhaust manifold, and composite manifold helped bumped up the power to 323HP as compared to the 312HP of the LLT. The LFX also sports dual overhead cams, variable valve timing, and E85 capability.
This article covers the standard procedure of how to change the oil in the 3.6L V6 LFX engine in a 2012 Chevy Camaro 2LT model.
- Socket Wrench with 15mm socket (for drain plug)
- 24 mm socket (for oil filter canister, 15/16" will sort of fit too)
- Jackstands or ramps
- Catch container for used oil
- Funnel
- Rags (just in case you make a mess)
- 6 quarts of 5W 30 Motor Oil. (Mobil 1 is my favorite)
- ACDelco PF2129 Oil Filter (cartridge type) *Note: The ACDelco filter seems to be a hard one to find. So here are the alternative crossover part numbers that also work: STP S8765 (my preferred 2nd choice), Purolator L25274, Napa FIL 7090, Amsoil LF489, Wix 57090, K&N HP-7003, and Fram CH8765
Draining the Oil
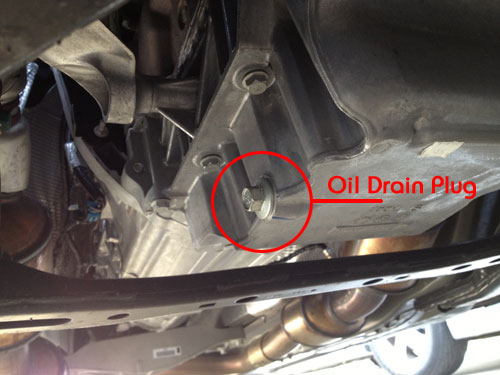
With your car properly secured on jackstands or ramps (remember to set your E-brake!), slide under the car and locate the drain plug on the bottom of the oil pan. Wipe off and remove any grime, dirt, or residual greases built up around the plug. You don't want any contaminants to enter the oil pan that could cause problems down the road.
Using a socket wrench, loosen the drain plug (remember "lefty loosey, righty tighty"). Before you go all the way of removing the plug, have your oil catch container ready and in position for the waterfall of black gold that is about to flow.
Let the oil drain completely out to the point where you dont see a continuous flow coming from the pan. Take a moment to clean the drain plug off of oil and any grime. Once the flow of oil has stopped (it may still drip...you wont ever get 100% of the oil out), screw the drain plug back into the oil pan by hand taking care not to cross thread the bolt. Once you have the drain plug back in (you can go ahead and move your oil catch container now), make sure tighten it but not over torque it. Around 18 lb-ft of torque is enough.
At this point, you are done with the underside of the car. Get everything out from under the car (oil catch container, rag, tools, etc.) Time to move topside.
Removing the Oil Filter
The design of the V6 LFX has the oil filter located on top of the motor next to the intake manifold. Rather than a canister type filter that screws into the block, the LFX engine utilizes a cartridge type filter, so changing it is quite clean and easy.
If you vehicle has an engine cover, you need to remove it which is quick and easy. Simply start with unscrewing the cap on the oil filler neck and set it aside. Grabbing one corner of the cover, start to pull upwards (you dont need to exert Hulk force). You should hear it unsnap from its connection points. Follow around until the cover is free and set it aside.
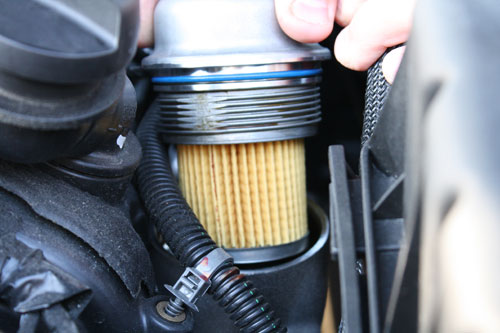
With the engine cover removed, the oil cartridge canister should now be visible. Using the 24mm socket, loosen the top of the oil filter housing. The oil filter should come off with it. *Tip - If you dont have a 24mm or 15/16" socket, a crescent wrench can be used. Take your time so you dont slip and round the corners of the housing.
With the top of the canister housing off, remove the used filter and let both drain. Clean off the housing and it's threads.
The new oil filter should have came with a new O-ring (the blue ring on the canister in Step 4 picture). Remove the old O-ring and replace with the new O-ring.
Replacing the Oil Filter
Now you're ready to put everything back together. Using some oil to lub up the oil ring around the upper housing piece, insert the new filter into the top piece.
With the new filter in place, screw the top piece of the canister housing back on. Careful not to cross-thread and strip the housing! Once snug, tighten the housing to around 18.5 lb-ft of torque.
Feeding the Monster
With your oil drained (and drain plug back in) and a new filter installed, it's time to refill your car's heart with some new amber blood.
Insert the funnel into the oil fill neck and begin to pour the new oil back in taking your time not to spill it. 6 quarts later, your engine's belly should be nice and full.
Double check your oil level by pulling out the dipstick and wiping it off. Now, reinsert it and pull it back out. Wait, why did I just pull it out, clean it and put it back in only to pull it back out? This is to make sure you're seeing an accurate reading on the dip stick with the new oil and not from the leftover dirty oil.
At this point, you can reinstall your engine cover. Just line it back up and give it a bit of pressure and you should hear it pop back into place. You're ready for burnouts!
Bonus step: When you're changing your oil at a friend's house and using his tools/equipment, be sure to make sure everything is back in its place and/or secured. I did this oil change at HowTune developer Ian Turgeon's house and he left out the part where his used oil container slowly leaks out of the cap. I got this picture a day later when he walked out into the garage and was slapped in the face with the aroma of used Mobil 1. Sorry Ian!
Resetting the Oil Life Indicator
Turn the key to IGNITION ON (do not start the engine).
(Instructions from this article: How To Reset Oil Light on a Camaro.)
Press the set/reset button to reset the system. The next screen indicates that the CHANGE OIL SOON message has been reset. If the vehicle has the uplevel DIC, when the gauges button is pressed and the OIL LIFE REMAINING mode appears, it should read 100 percent OIL LIFE REMAINING.
- Oil Drain Plug - 15mm
- Oil Filter Canister Housing - 24mm (15/16" will sort of fit)


There are 4 Comments.
Say Something.Nice Writeup!!
Hi! Would this DIY carry over step-by-step exactly to a 2013 Chevrolet Camaro 2LT/RS 3.6L V6?
The Camaro LFX v6 was used from 2012-2015, and this article should apply to all of those years
Ok, thanks!
You have to log in to comment...
We'll publish your comment after you're logged in.
Written by:syo237
Related HowTune Articles
Written by:syo237
Resetting the Oil Life Indicator
Written by:ijdmtoy
Install the Lower Bumper License Bracket
Written by:syo237
Programming Keys
Written by:syo237
Change the Battery
Written by:iturgeon
Replace the Turn Signal Bulbs
Get notified about new articles.
We don't sell or share your info.