Replace The Headlight Bulb on a Mazda 3
Let's replace a 2004, 2005, 2006, 2007, 2008 Mazda3 headlight bulb (1st generation). Especially how to deal with that bulb retainer clip.
Replacing headlight bulbs is a pretty quick and simple maintenance procedure. This article will cover everything you need to know, and provide you with replacement headlight bulb part numbers.
For some reason, the bulb's on our Mazda 3 burn out several times a year, so I've been replacing them fairly often.
Quick Steps to Replace a Mazda 3 Headlight Bulb
- Open the hood.
- Disconnect the wire connector.
- Remove the dust cap and unlatch the retaining clip.
- Replace the burned out bulb, do not touch the glass.
- Reconnect everything.
- Test and clean up, you're done.
- H7 Headlight Bulb: Sylvania SilverStar zXe, SilverStar Ultra, GE Nighthawk Platinum, Phillips X-treme, or just Phillips Standard.
Open the Hood
The hood release is located on the bottom of the driver's side of the dash. Just pull the lever up.
Locate The Bulb to Replace
On the 2005 model like this, the headlight bulb is the outermost of the two headlight bulbs. The high beam is the bulb closest to the center of the car.
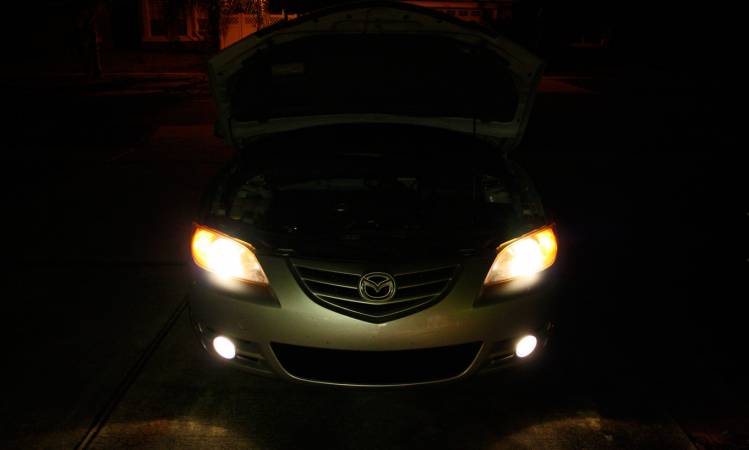
To double check I turn on the lights and inspect which bulb I need to replace.
Remove the Burnt Out Bulb
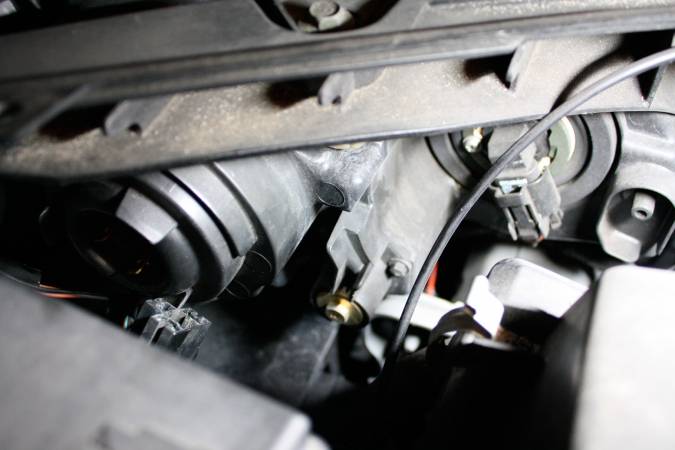
Disconnect the connector on the rear of the bulb. It just pulls straight out, but you may need to wiggle it a bit.
Unlatch the metal locking pin/clip. It's a little hard to see, and not obvious how it locks, but push it in and to the side to free it the latch. One side unhooks, the other acts as a hinge.
Pull the bulb out, working it around the the locking clip. Here you can see the bulb, the Mazda specific adapter attached to it, and if you look close, the burnt filament.
Disconnect the Bulb Carrier
Install the Bulb Carrier
Put the new bulb in the carrier. Be careful not to touch the glass of the bulb, supposedly the oils on your hands can cause hot spots that result in shorter bulb life.
Install the new bulb
Place the new bulb and adapter into the headlight housing. The bulb only goes in one way, be mindful of where the directional tab on the bulb is and how it needs to align to fit into the housing.
Lock the Retaining Clip
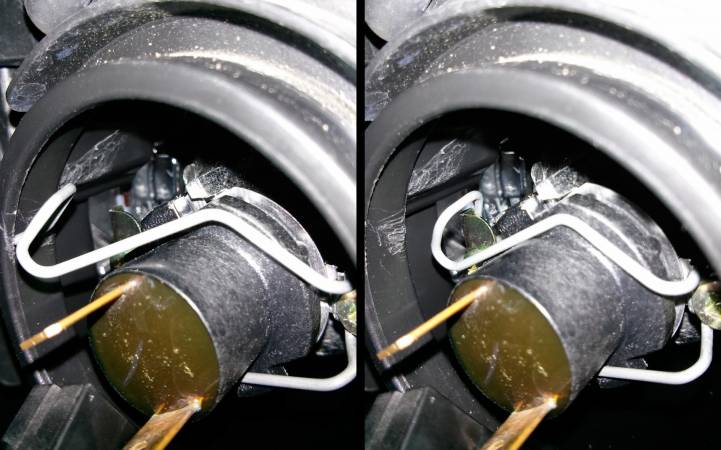
This is the dumbest part. I've managed to clip this correctly on the first try once. Other times I've spent 30 minutes trying to get the clip into the right position.
Hopefully these pictures will keep you from wasting time like I did. (note all the scratches from my previous miss-adventures)
Basically you need to push the clip pretty far into the housing, and get it latch behind the little metal retainer.
Install the Rubber Seal
Replace the rubber seal. Be sure the press it in around the center of the bulb so that it seals properly (it slides down the sides of the bulb some).
Reconnect the Wire Harness
Now plug the power connector back onto the bulb. Again, this only fits on one way so just match it up and press it onto the prongs on the back of the bulb.


There are 19 Comments.
Say Something.This post was PERFECT. My first time changing my own lights. I only used this how-to guide even though there were videos available because the pictures are clear and the instructions are so crystal clear. Thank you!
Thank you for the instructions. I have had the low beams replaced at least 10 times since buying the car new in 2005 and every repacement was at the dealer because the manual instucts so. I changed the bulb myself in less than 8 minutes. It takes longer to get checked in at the service department. I will save time and money now since last bulb lasted just over 13 months. Thank you again.
thanks...is a good and simple explanation... the pictures so nice..
Muchas gracias, realmente me estas ahorrando mucho tiempo malgastado... y mal humorado intentando sacar el gancho metalico.. Las fotos.. muy buena calidad.. slds
From Venezuela---
Thanks,
Just changed mine. Took all of 10 minutes.
My first time changing the lights too. Your instructions worked like a charm. Thank you.
Nice instructions. This is by far the worse headlight bulb design I have encountered. In the nine years I have owned my Mazda 5 sometimes it has taken 10 minutes other times I have struggled for over an hour.
Thank you so much for this! My fingers are a bit sore from trying to push the pin in. I finally used the handle of a small screwdriver to get it in far enough to hook. I could not have done it without these great photos and instructions.
This was great, thank you! By FAR, the hardest and most time-consuming part was trying to get the clip re-engaged. What a PITA!!! But I finally got it after maybe 30-40 minutes. Thanks again! :)
Good article. I have a 2008 Mazda 5 with 125000 miles. Bought it new. Only problems so far are:front top strut mounts both sides at about 100,000, leaking oil cooler gasket, leaking auto transmission pan, front sway bar end links and bushings, rear sway bar end links, other noisy suspension bushings. I will try and post an article on replacing the oil cooler gasket.
@deadeye Thanks! We loved our 3 a lot. It had over 100k miles when we sold it and changed over to a sports coupe. I only replaced the expected stuff: brakes, tires, a belt, spark plugs, a battery, filters, and a few of these headlight bulbs. I think the only unusual thing was the engine mount.
Looking forward to seeing your article.
Great article with great pictures! Is this maintenance just as easy for 2009 Mazda 3? Articles online keep referencing taking off wheel covers or bumpers...
Great article with great pictures! Is this procedure the same for 2009 Mazda 3? I keep reading online articles referencing removing wheel covers or removing the bumper to gain access. Thanks!
@gnome I have a friend with a newer Mazda 3, I'll try to schedule some time with him to check it out. Thanks for the Kudos.
This was amazing. Worked perfectly. Interestingly though, I had much more trouble getting the retainer clip open and was able to close it on the first try by just pushing it in.
Very nice, thank you!
@gnome, I followed this how-to on my 2009, it worked as expected. One thing I noticed, the driver's side has a sort-of triangular plastic piece that is in the way, just above the headlight connectors. Remove the three re-usable plastic rivets, then it is just as "easy" as the passenger side. Definitely did not have to mess with wheel covers or bumper.
Grandsons Mazda 3 Faulty H7 globe was replaced by mechanic at recent service & lasted a few weeks before the connector fell off. On examination it was then obvious the socket & rubber seal had been fitted (& removed) as one - the globe base not fully home against the connector & the rubber seal not properly seated. This guide is a clear & concise description of how it should be done & appreciated by Mr Fixit (Grandad)
Thank you for the detailed guide! I have a 2007 Mazda 3 hatchback, and I'm trying to figure out the best bulb to purchase to replace the low beams. Looks like factory standard is an HID, but they are $$$. Does it matter if I replace one (not both) with one of the halogens listed?
Thank you for the detailed guide! I am about to attempt this myself since the mechanic claims the whole front housing needs to be removed and will take at least an hour...
I have a 2007 Mazda 3 hatchback that came stock with HID bulbs. Can I replace with one of the halogen bulbs listed above?
Love your site, clear and precise instructions with added tips that only come from experience. Some comment state these are the worse design light bulbs out there, this is incorrect. These are crappy for sure, but 03 to 06 Nissan Altima takes that title, same design except they ground the bulb through the clip which overtime due to vibration creates a poor connection, high resistance = high heat that melts the headlamp housing. I do think the Mazda lamp set-up is the reason they burn out quick.
You have to log in to comment...
We'll publish your comment after you're logged in.
Written by:iturgeon
Related HowTune Articles
Written by:iturgeon
Cleaning the MAF Sensor
Written by:iturgeon
Replacing Spark Plugs
Written by:iturgeon
Replace the Air Filter
Written by:iturgeon
Replace the Roof Mounted Radio Antenna
Written by:iturgeon
Replace the Passenger Side Motor Mount
Get notified about new articles.
We don't sell or share your info.