Upgrade The Radio With Modifry Dash Controls on a Honda S2000

Replacing the stock stereo system can be very easy with some help from Modify and their Dash Control Interface.
This guide covers how to hook up a DCI-compatible radio using the DCI and a matching Modifry Plug-n-Play DCI wiring adapter harness. This means no soldering required, working dash controls and the whole process should be under an hour.
What to shop for:
- A compatible Alpine or Kenwood radio - This article is for the Wired DCI which I recommend.
- The Plug-n-Play DCI harness - Modifry has these for Alpine and Kenwood units. You don't have to get one of these but if you don't you'll need to solder the harness yourself.
- A wired DCI
I wanted a new radio that would support aux in (on the front so no routing of audio cables), Bluetooth audio and could match the orange LED color scheme and minimal look of the car. I went with the Kenwood KDC-BT855U which was compatible and featured everything I was looking for.
- 14mm wrench
- Phillips screwdriver
- Pry tool (Optional)
- Microfiber cloth (Optional)
- A new head unit compatible with the Modifry DCI and harness (Kenwood KDC-BT885U)
- The Modifry DCI
- Modifry wiring adapter compatible with your radio brand
Removing the radio door trim
The first step is removing the radio door trim piece. On an AP1 model this is an easy job - with an AP2 you'll need to remove some of the console trim first. These instructions are for an AP1.

Grab near the bottom of the trim and pull towards you. It should just pull off with a moderate amount of force.

For reference, here's what the back of the trim piece looks like - notice the placement of the clips.

Removing the shift knob
We need to remove the shift knob to give us more clearance for taking out the radio. Use your 14mm wrench and turn the locking nut clockwise to back it off the shift knob, then screw the knob off the shaft.

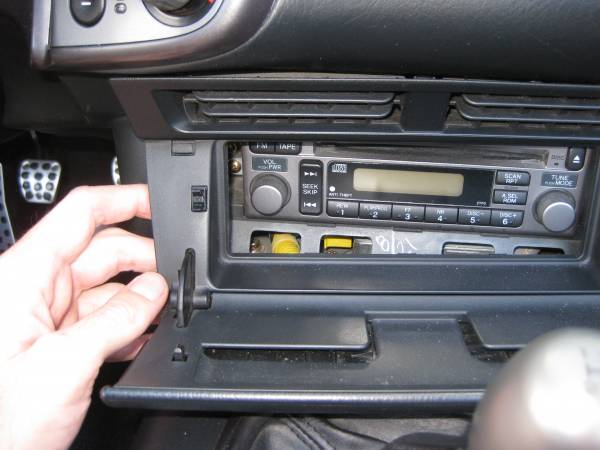
Removing the old radio
Now remove the four screws (A) holding the radio in place (the picture shows them already removed).


Preparing the new radio for installation


Prepping and connecting the DCI
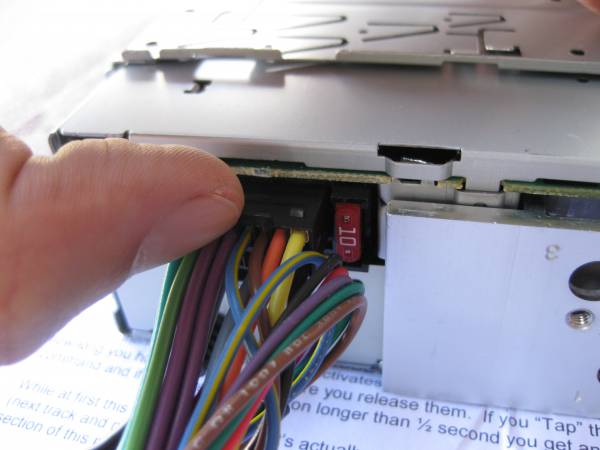
On the DCI you should see four dip switches. These modify how the DCI works. The next steps cover what these switches do, cited from the installation manual

Switch 1 - Mute Control - This switch is normally set to OFF (down) sending mute commands via the DCI blue wire to the head unit ATT or Cell Phone lead. If your head unit does not have a separate ATT or Cell phone wire you should change switch 1 to ON (up) so the DCI sends the MUTE command via the 3.5mm cable/white wire.
If you are using a Blue Tooth adapter module and your ATT/Cell Phone wire is connected to the BT module you should set switch 1 ON (up) so the DCI and BT module do not "fight" each other.
Remember to insulate the DCI blue wire if you don't use it for the mute function.
Switch 2 - Tap-n-Press - This switch activates the "Tap-n-Press" feature which changes how the MODE and CH dash buttons work. With switch 2 OFF the Tap-n-Press feature is not activated, and the MODE and CH buttons act "normal", sending the same command no matter how you press them. Setting switch 2 ON activates "Tap-n-Press" and the DCI will perform different commands depending on how long you hold MODE or CH before you release them. If you "Tap" the button for less than half a second you get one command and if you "Press" the button longer than half a second you get another command.
I recommend turing this to ON. This will take over your giant MODE button to become a general 'next station/track' button, which is significantly more useful!
Switches 3 and 4 depend on the brand of radio you're installing. For Alpine units set 3 and 4 to ON. For Kenwood set 3 to OFF, 4 to ON. For Clarion set 3 and 4 to OFF. For JVC units set 3 to ON and 4 to OFF.
Connecting the DCI to the new radio
Connect the five pin plug and optionally the blue mute wire into the DCI. Insulate the blue wire if you don't connect it to the DCI (more information on the mute switch above).

Connecting the new radio


Connecting a Bluetooth mic (Optional)
If your radio came with a mic for cellphone calls you'll need to attach that somewhere. I wanted the mic to be as hidden as possible while still close enough to my face without having to modify any trim pieces. I decided on placing it close to the ignition switch, attached with tape.

Routing the wire is easy - You can simply feed the wire around the trim as shown below. You might need to bundle up excess cable with a zip tie if your wire is long.


Finding a home for the DCI
The DCI instructions recommend to put the DCI somewhere away from the radio so that it doesn't overheat. Additionally, it would be best to have the DCI in a place that you could get access to it in case you wanted to change any settings post-install. I decided to put mine behind the trim piece in the passenger side.

Use a pry-tool and a microfiber cloth to carefully remove this trim piece. I attempted to brute-force the thing and ended up making a crack in mine (luckily replacement parts are $7!)


With the piece off it's easy to simply route the DCI over to it. Here you can see mine hanging down. I recommend leaving this here until after you've tested your new stereo to see if you want to change any settings. Once you're happy with it you can tuck it inside this compartment and snap the trim piece back on.

Installing the new radio
Push the new radio in and attach it with the four screws you removed earlier. You may need to manipulate the harness to push it out of the way in order to comfortably get the new radio into position.


Reinstalling the shift knob
Screw the knob back onto the shaft and turn the locking nut counter-clockwise to back it up against the knob. If your knob has a shift pattern you'll want to hold the knob in place at the same time to make sure the pattern is oriented in the right direction.

Testing it out!
Now make sure it works! You'll want to try the radio (to make sure you connected the antenna correctly), left and right channels, and mute. You can also play with the Tap-n-press features of the DCI, and determine if you'd like to keep it enabled or turn them off.

Done! Enjoy the improved sound and modern conveniences in your upgraded S2000!
- Shift knob lock nut: 14mm
- Passenger trim: Honda Part #77320-S2A-003ZA (Black), #77320-S2A-003ZB (Blue), #77320-S2A-003ZC (Red)
- Passenger trim clips: Honda Part #90666-S84-A01
- Radio panel: Honda Part #7721-S2A-A02ZA (Black), #7721-S2A-901ZA (Blue), #7721-S2A-901ZC (Red)
There are 0 Comments.
Say Something.You have to log in to comment...
We'll publish your comment after you're logged in.
Written by:zachberry
Related HowTune Articles
Written by:zachberry
Fix the Brake Lights Stuck On (or Broken Cruise Control)
Written by:zachberry
Change the Oil
Written by:zachberry
Replace the Air Filter
Written by:zachberry
Upgrade the Amber Side Marker Lights to Clear
Written by:zachberry
Change the Rear Brake Pads
Get notified about new articles.
We don't sell or share your info.