Replace The Brake Light Bulbs on a Nissan Versa

Replacing the brake and tail light bulbs on a 2006-2012 Nissan Versa (aka. Nissan Tilda outside North America) is fairly simple, here's the guide to do it your self.
Nissan has holes in the body to access the tail light bulbs that may make the bulbs too difficult to remove without removing the whole tail light.
- 10mm deep socket and ratchet (or wrench)
Gain Access to the Tail Lights
On the sedan body, remove the plastic pin fasteners in the carpet around the tail lamp.
On the hatchback, you'll need to remove the 2 plastic covers behind the tail light inside the trunk.

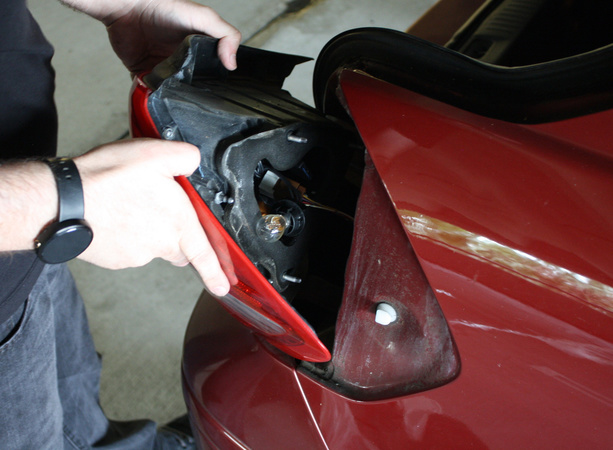
Disconnect the Wire Harness
The wire harness is a single plug, just disconnect it by squeezing the clip and pulling it out of the tail light.

Remove the tail light
Remove the 3 x 10mm nuts that hold the tail lights in. They screw onto studs protruding out of the tail light.

Identify where the retainer studs and sliding clips are on the tail light before removing it.
Both the hatchback and sedan have 2 studs that stick out into plastic clips on the car body. These studs face directly out of the tail light toward the front of the car.
They both have an additional clip that holds the frontmost part of the tail light snug against the car.
All of these clips will allow the tail light to slide out of the car by pulling it toward the rear of the car (not to the side).
Pull the tail light off the car. A panel prying tool will make this a little easier, but you can pull it out with just your hands.
Be careful, go slow, wiggle, yank and pull the tail light. If you're having trouble try pressing from the inside, try moving your hands to a new position.
Remove the Brake Light Bulb
All of the bulbs in the housing rotate counter clockwise then pull out of the housing.
The tail light & Brake light bulb on the sedan is the bulb shown below. Just twist it and remove.
The bulb removes from the socket by slightly pressing it into the socket and rotating it counter clock wise about a half turn.

Install the New Bulb
Grab your new dual filament 7528 Bulb and insert it into the socket. It'll only go in easily one way, so line up the posts, press in slightly and rotate. If it doesn't rotate, flip it 180 degrees and try again.
Slide the bulb and socket back into the tail light housing. Rotate clockwise to lock it into position
Install the Tail Light
Carefully line up the studs and clips on the tail light, and press it back onto the car.
Use a broad open hand to spread out the pressure against the housing.


This article was part of HowTune's Light Up UCF free bulb giveaway. We fix burned out bulbs to make campus safer while writing awesome how-to articles. You're welcome.
There are 2 Comments.
Say Something.These are the best instructions I've found for replacing the Nissan Versa sedan tail light. I can't believe Nissan made it such a PIA, but then I can't believe my 2012 Versa sedan's CVT died at 35K in the middle of the interstate on the way to the airport for my father's funeral, either.
I never was able to get the wire harness off. Mine looks different from the photo, and connects from outside the car instead of inside the trunk. I was kind of concerned because there are exposed wires above the plug, as in the photo. It seems like just replacing the taillight could damage those.
The housing on my lights is more of a triangle, with sharp points at the bottom rear and top side of the car, and the stud catch in the center of the triangle at the third point at the bottom side of car. Once I got the stud lined up with the catch, I had to gently press on the points of the triangle at the bottom rear and top side to slip the catch into place on the stud.
Thanks for these instructions. I couldn't have done it without them!
Yes it is a pia to replace the tail lights in a 2011 versa ,sedan!first remove a plastic fastener with a screw driver, then pull back the simulated cloth cover, remove 3 10mm nuts and then slide the entire plastic lens assy out towards the rear of car, then rotate socket with the bad bulb and replace bulb. I guess that doesn't sound so bad but it doesn't slide out that easy or slides back in. bad design!
You have to log in to comment...
We'll publish your comment after you're logged in.
Written by:iturgeon
Related HowTune Articles
Written by:sytyguy
Restore the Plastic Headlight Lenses
Written by:GAShanock
Replacing the Power Seat Switch
Written by:iturgeon
Replace the Engine Air Filter
Written by:atomic
SyTy Short Shift Install On the 700R4
Written by:iturgeon
Change the Engine Air Filter
Get notified about new articles.
We don't sell or share your info.