Change The Headlight Bulb on a Chevrolet Impala
Learn how to change the headlight bulbs on a 9th generation (20062014) Chevy Impala. This article will cover low beam, high beam, running lights, parking lights, front turn signal, and position lights.
The process is pretty easy, but you do have to remove the headlamp assembly from the car.
- 8mm hex socket and ratchet
- H11 Low Beam Headlamp - Standard Bulb or H11 SilverStar Bulb
- H9 High Beam Headlight - Standard Bulb or Standard Bulb
- Front Turn Signal Bulb - Amber 4157NA
- Front Running or Position light Bulb - Amber 4157NA
Open The Hood
Release the hood latch by pressing the latch lever to the side. The latch is located at the center of the grill, just under the hood.
Remove The Headlight Housing
Remove the large white retaining clip.
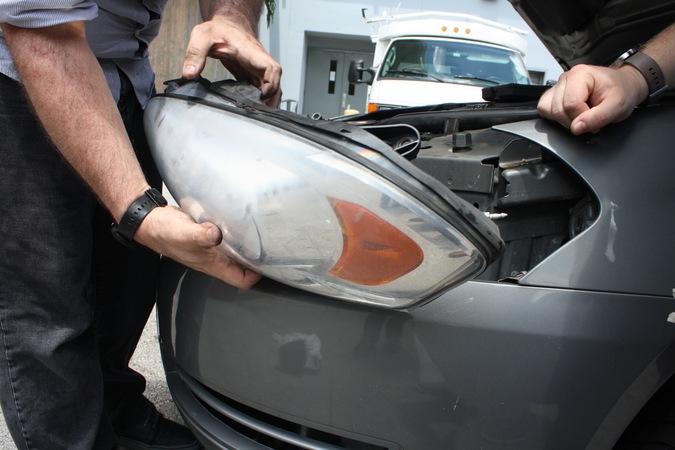
The top bends rearward slightly to disengage the locking slot, then pulls upward, out of the car.
Pull the Headlamp Housing off the car
There is a retaining clip/stud on the outer side close to the fender.
To release this, pull the headlight forward away from the car. It should move forward an inch or so.
The headlight is now only held in place by the body panels obstructing it's movement.
The innermost side near the grill, a lip on the bottom, and the fender will all block movement.
Slowly angle and lightly tug on some of the panels to get the housing free.
There is a single large electrical connector to disconnect. Squeeze the release clip and pull the wire connector out of the headlamp housing.
Remove the Burned out Bulb
The low and high beam bulbs are behind large black screw on plastic covers.
The H11 low beam is located under the large black cover nearest the outer side of the headlight.
The H9 high beam is located under the large black cover nearest the center grill side of the headlight
The Amber 4157NA parking light is the small bulb on the outer corner.
The Amber 4157NA turn signal or blinker is the small bulb near the center of the car.
If removing the low or high beam headlight bulbs, remove the black cover by rotating it by hand counter clock wise.
Every bulb in the housing can be removed by rotating it counter clockwise approximately 90 degrees. Just rotate and pull the bulb out of the housing.
Install a new bulb
Install your new bulb.
Take note of the prongs on the bulb and socket. Line them up to get the bulb in and rotate clockwise to tighten
Test the new bulbs
Reinstall the Headlight housing
Line up the retaining clips and sneak the headlight housing in around the bumper, grill, and fender. Be patient and take car not to just jam it in to place till the housing has cleared all the body panels.
Install the white plastic retaining clip.
The bottom slides into place first while the top bends back to clear the stud it locks into.
This article was part of HowTune's Light Up UCF free bulb giveaway. We fix burned out bulbs to make campus safer while writing awesome how-to articles. You're welcome.


There are 4 Comments.
Say Something.This instruction is very helpful. The only difference for my 2011 Impala is that my car has a 7 mm hex nut instead of an 8 mm hex nut. Everything else made it quick and easy to change out my burned out low beam bulb. Thank you very much for this information.
Thanks for this thorough and easy to understand procedure. I replaced my passenger side low beam headlight today and it took about 10 minutes, start to finish. And to think, a mechanic one time tried to convince me that procedure was very complicated and the Chevy dealer would charge me about $250 to do it but he'd give me me a break and do it for $80 when the time came. Yeah, right. I did it myself for less than a tenth that much.
I have an 08 impala and it used a 7mm instead of 8mm. Changed both lights in 10 min! Thanks!
What is the part that the white clip goes into? After a minor accident my headlight is loose because the white clip attachment is missing.
You have to log in to comment...
We'll publish your comment after you're logged in.
Written by:iturgeon
Related HowTune Articles
Written by:iturgeon
Change the Air Filter
Written by:iturgeon
Change the Engine Air Filter
Written by:iturgeon
Change the Cabin Air Filter
Written by:ijdmtoy
Install the Flush Mount LED Podlights
Written by:syo237
Holley HP / Dominator Adjusting the TCC Lockup Control
Get notified about new articles.
We don't sell or share your info.