Replace The Brake Pads & Rotors on a 2000-2007 Toyota Highlander

Toyota Highlander brake pads and rotors are very easy to change yourself. This article includes all the parts, tools and torque ratings you need to get it done right the first time.
We'll cover replacing both, but you probably don't need to replace the rotors unless they are warped or worn too thin.
The Highlander in our article had a full set of "lifetime" guarantee brakes done at a major chain. The performance and noise from those left something to be desired, so we replaced all the components with new, high-quality parts.
The Highlander uses a drum style emergency brake in the rear. Emergency brakes don't often need to be replaced, and we don't cover them in this article.
- C-Clamp or Caliper Spreader
- Socket Set Like my favorite GearWrench sockets
- Torque Wrench
- Hydraulic Jack & Jack Stands
- Front Pads: Akebono ACT884 ProACT Ultra-Premium Ceramic
- Rear Pads: Akebono ACT996 ProACT Ultra-Premium Ceramic
- Front Rotors: Brembo 2025533
- Rear Rotors: Brembo 202586
- Brake Cleaner
- Permatex 85188 Ultra Disc Brake Caliper Lube
- Front Rotors: Brembo 2025533
Lift the Vehicle & Remove the Wheels
The wheels need to come off, so you'll need to lift them off the ground. Use a jack and jack stands or if you have access to a lift, use that.
The Highlander's lift points are located at the front and rear of the pinch weld seams that run down each side of the vehicle. The specific points where you can use a jack or jack stand can be identified by the little notches in it. Do not lift or support it anywhere else along that seam.


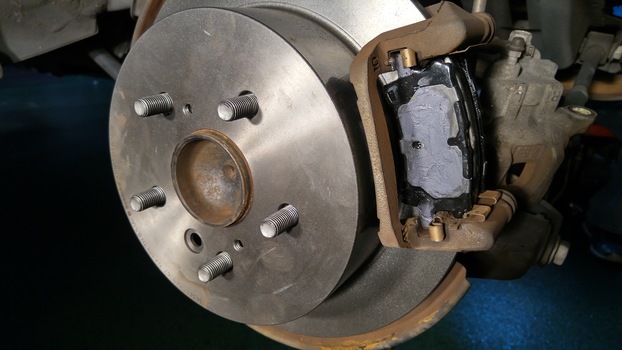
Remove the Front Brake Pads

Slide the caliper off the pads and set it aside. Make sure not to stress the rubber brake line by letting it dangle.

Remove the Front Brake Rotor

Install a New Front Brake Rotor
Slide the rotor onto the wheel studs. If you need to hold it in place, use one of the wheel lug nuts to keep it from falling off.
Install New Front Brake Pads
Apply the caliper lube on the back sides of the pad and around the edges where it touches the clips.
Slide the caliper back onto the new pads, rotor, and caliper carrier. Be careful not to rip the little rubber boots on the slide pins.
Remove the Rear Brake Caliper

Remove the rear caliper by sliding it off the brake pads and setting it aside. Again, don't let it hang from the rubber hose.
Removing the Rear Brake Rotors
Try pulling the rotor off, more then likely it won't just slide off.
If it doesn't slide off - you'll need to loosen the emergency brake shoes inside the rotor.
To do that, you'll need to remove the little rubber plug on the face of the rotor.

That will open up a small access hole that will allow you to rotate the emergency brake shoe adjuster.
It's difficult to see, but it's located at the bottom of the assembly, a little toward the front of the vehicle (about 7 o' clock looking at the wheel).

Turn the adjuster using a flat screw driver and check to see how free the rotor turns.
Once it's loose enough that the shoes no longer drag, you should be able to get the rotor off. At this point, if it doesn't move, use a small sledge or hammer to tap the rotor off the hub.
Install a New Rear Brake Rotor
Install New Rear Brake Pads
Compress the rear brake caliper piston using a c-clamp. Use an old brake pad to apply pressure to the caliper piston.

Slide the new brake slide pins into the caliper and tighten to 32 ft-lbs. Note that the bottom most pin has a a darker tip.

There are 1 Comments.
Say Something.Awesome THANK YOU!
You have to log in to comment...
We'll publish your comment after you're logged in.
Written by:iturgeon
Related HowTune Articles
Written by:iturgeon
Replace Struts
Written by:iturgeon
Change the Air Filter
Written by:iturgeon
Change the Tail Light Bulbs
Written by:iturgeon
Replace the Headlight Bulbs
Written by:iturgeon
Change the Oil
Get notified about new articles.
We don't sell or share your info.