Install The Wiring For A Dashcam on a 2014 Ford Fiesta
Dashcams (also known as car DVRs) are a relatively cheap way to protect yourself in case of an accident. Basically, they record video (and audio) constantly while you're driving. Usually, they start recording as soon as they receive power, and stop after they lose power. This works great in cars that have "switched" 12v accessory outlets, but the 2014 Fiesta's 12v outlets are powered all the time.
To get around the lack of switched power outlets in the Fiesta, we're going to tap into a circuit that is only powered when the car is on. There are many such circuits, but we will be using the windshield wiper circuit for this article.
Keep in mind that this tutorial can be used to semi-permanently install many different kinds of electronics, such as radar detectors and GPS navigation devices.
Here's a more in-depth description of dashcams:
A Beginner's Guide to Dashcam DVR Cameras
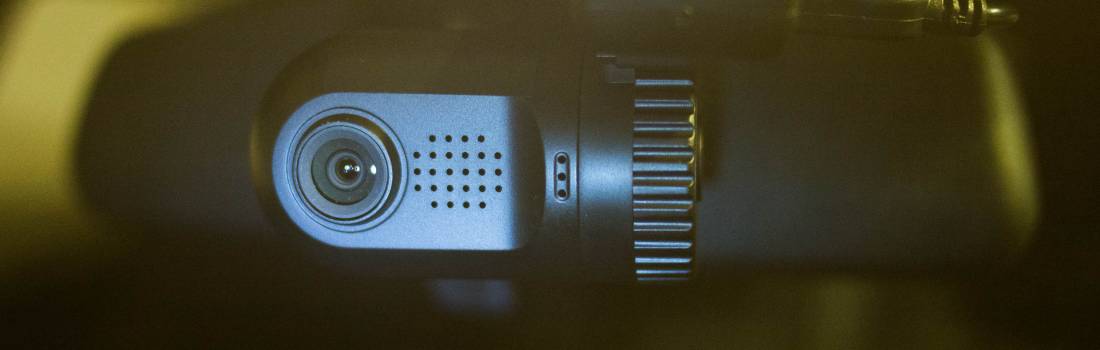
The one I'm installing in this article is the Mini 0801.
Update: Commenter fc321 says that you can use a 5 amp fuse for the dashcam, and still use a 20 amp fuse for the wiper blades.
Update: Commenter Noidea says that the European spec Fiesta ST has a completely different fuse box, but you can use the 15amp fuse for the rear wiper, and that the glove box requires more than pulling to remove.
- 12v Accessory Outlet (with clips, which make grounding it easier)
- "Add-a-Circuit" or Fuse Tap (20amp, ATM/Mini Size)
- 20amp ATM/Mini Fuses (Might as well get a bunch of different ones, because they always blow at the most inconvenient times.)
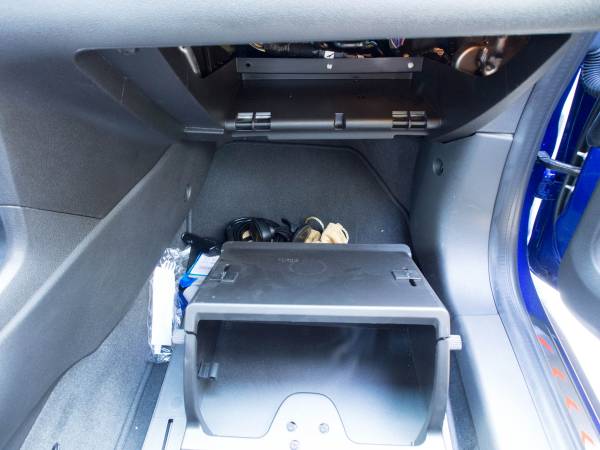
Removing the Glove Box


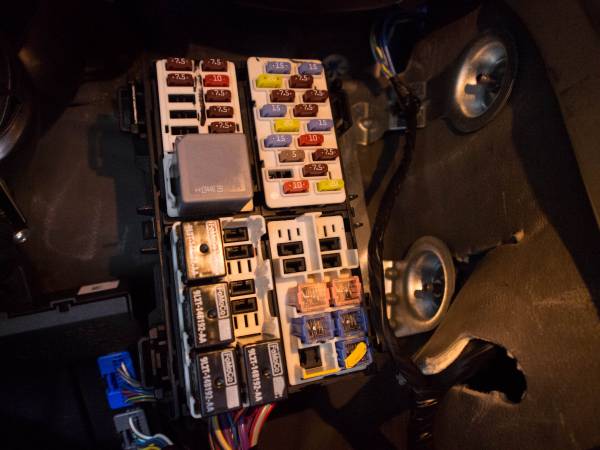
Before moving on to the next section, remove the 20amp fuse marked in the image below. Hang on to it, because you'll need it later. (FYI, this is the fuse for the windshield wipers.)
Preparing the Parts for Installation

If your 12v power outlet comes with a clip on the positive (red) wire, cut it off with your pliers and strip the end.

Insert the stripped positive (red) wire from the 12v power outlet into the crimp connector on the fuse tap and crimp it.

Installing the Fuse Tap
If you haven't already, insert two 20amp fuses into the fuse tap and plug it into the windshield wiper fuse slot.

If your 12v outlet has a clip on the end of the ground (black) wire, clip it to some unpainted metal under the dash. If it doesn't have clips, you can use a crimp-on connector to secure the ground wire to one of the bolts. The nut referenced in the image below is 10mm. The clip solution I'm using seems really secure, but using one of the nuts to secure the wire to a bolt is a more permanent solution.

Routing the Wires
Drop the end of the wire that will connect to your dashcam through the hole in the bottom right of the glove box area.


Work the wire sideways into the gap between that plastic trim piece and the bottom of the dash and route the wire out to the side so that it can go under the weather stripping to the right.

Affix your dashcam to the windshield, and pull enough wire through the hole to plug into the dashcam. Plug the power adapter into your newly-wired 12v outlet and turn on your car to test out the wiring. Then, work backwards from the dashcam following this path.

Tuck the wire into the top of the headliner. I had to make the wire a little thicker in some spots using electrical tape to get it to stay put.

When you get to the pillar, tuck the wire behind the plastic and work it toward the weather stripping around the door frame.

Tuck the wire behind the weatherstripping until you get down to where the wire enters the glove box.
Use zip ties to secure the power adapter, 12v outlet, and any excess wire where it will not interfere with closing the glove box. Make sure you clip off the ends of the zip ties; I haven't done that yet in this picture.

Your dashcam should now turn on and off with your car, and you'll be able to forget it's even there until you need it.
Again, this method can be used for any device that needs a switched 12v power supply. You could even plug in a usb power supply and charge your phone in the safety of your glove box.
There are 3 Comments.
Say Something.THank you for this write-up and for the recomendation on using alligator clips to ground the wire because the bolt is an unusual size and I did not have that particular socket in my socket set.
THe only thing I want to point out is that you can use a 5A fuse in the fuse tap for the dashcam (more than enough) and the 20A fuse for the wipers on the second slot.
Thanks for the write up, a few things to note if you have a euro spec ST, the fuse box is completely different ( i used the 15 amp for the rear wiper) and the glovebox cannot be removed by pulling it.
Btw the bolt size is 10mm, but is too long to fit a normal socket over.
Great write up--thanks! Just got my ST 2 weeks ago and wanted to get a cam in ASAP. FYI...I used a 12V USB adapter instead--made the wiring cleaner and less bulky: https://www.amazon.com/gp/product/B072JM3NWG?tag=azy95x-20
You have to log in to comment...
We'll publish your comment after you're logged in.
Written by:BagOfArms
Related HowTune Articles
Written by:BagOfArms
Replace the Dome Light Bulbs
Written by:syo237
Change the Cabin Air Filter
Written by:BagOfArms
Lower the Cargo Floor
Written by:iturgeon
Tips And Tricks For Using the Easy Fuel Capless Filler
Written by:BagOfArms
Change the Oil
Get notified about new articles.
We don't sell or share your info.