Adjusting Headlamps on a Volkswagen Jetta
One of the few design flaws with the MKIV Jetta (1999-2005) is that if someone leans against your headlights (resting against them, leaning over while wrenching, etc...) it can overwhelm the adjustment screw and alter the headlamp position (and even strip out the adjustment screw). So, two things need to happen....(1) keep people from leaning against your car, and (2) learn how to adjust the headlamps.
Because, let's face it, Few things are worse than not being able to see properly at night.....and it's just down right dangerous, too. And while we can't help you with keeping people off your car (I have some thoughts on that though), we can show you how to adjust the headlamps. Here's how....
- 6mm Hex Allen Key
- No parts needed for adjustment. Use Wagner 9007 bulb if changing headlamp bulb.
- Headlights are out of adjustment.
- Unable to see properly at night or in fog and/or people flash their headlights at you often (indicating the low beams are shining too high).
Adjusting the headlamps
Gently lift the hood to reveal the hood release handle. Pull the handle and then lift the hood.....allowing the hoods struts to fully lift the hood.
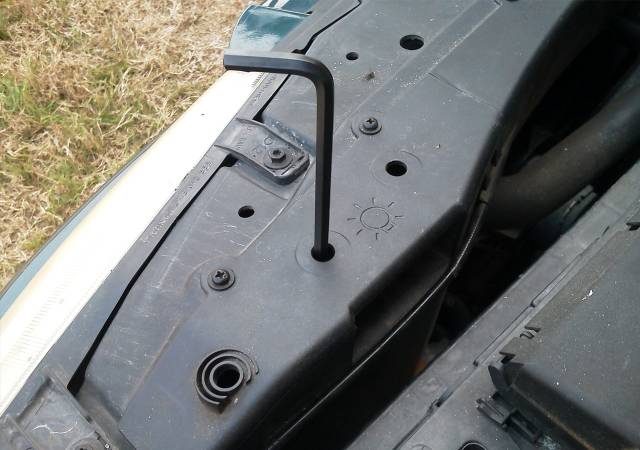
Locate the middle of the 3 holes in the driver-side headlamp cover panel and insert a 6mm hex wrench into the hole, aligning it with the headlight adjustment screw socket. Rotate the wrench clockwise to raise the headlamp and counterclockwise to lower it.
Ensure the headlamps are properly adjusted by parking on a level surface about 25' away from a large wall (such as a driveway leading to a garage door) at nighttime. Aim the headlamps using the following procedure:
:: Find a level surface and a vertical wall or garage door. Park the vehicle close to the wall and, using the masking tape, mark the low-beams' horizontal centerlines.
:: Mark the vertical centerlines of each beam and the center of the vehicle with masking tape. Marking the vehicle centerline is helpful to determine side to-side alignment, or lack thereof.
:: Move the vehicle 25 feet straight backwards. Turn the horizontal-vertical adjusting screws to position the low beam hot spots two inches below and to the right of the taped centerlines.


There are 3 Comments.
Say Something.I don't recall giving you permission to use my photo as your cover head.
Apologies, Mark. I found that image on a forum post and the person who posted it claimed ownership. I asked them for permission, which they gave, but apparently they weren't truthful. Will change the pic ASAP.
Hmmm... I've tried following these instructions and the lights aren't adjusting at all.... Any other thoughts?
You have to log in to comment...
We'll publish your comment after you're logged in.
Written by:sytyguy
Related HowTune Articles
Written by:Ten Six Garage
Replacing the Timing Belt
Written by:Ten Six Garage
Replacing the Timing Belt
Written by:iturgeon
Subaru Lights Stay On And Won't Turn Off
Written by:iturgeon
Install the Column Lock Bypass
Written by:cpeterson
Replace the Headlight Bulbs
Get notified about new articles.
We don't sell or share your info.