Replacing The Timing Belt on a Volkswagen Jetta TDI MKIV

This article will cover the replacement of the timing belt on a 2000 Volkswagen Jetta TDI equipped with the 1.9 ALH engine. The ALH engine was also used in other Volkswagen and Audi vehicles. Replacement should be similar, but some steps might vary.
This belt replacement should not be attempted by novice mechanics. Specialized tools, computer software and laptop will be required to complete the job properly.
This job books for 5.2 hours of labor with the water pump replacement. Personally I like to take my time and clean everything including the nuts and bolts while I'm in there, so I would dedicate a good weekend to this job, especially if its your first time.
- ALH Timing Belt Tool Kit : Includes Sprocket Holding Tool, Camshaft Locking Plate, Tensioner Spanner Wrench, Camshaft Sprocket Puller, Injection Pump Locking Pin, Crankshaft Locking Plate and a stubby 5mm Allen Socket.
- 5mm 3/8 Drive Allen Socket
- 6mm 3/8 Driver Allen Socket
- 10mm Offset Box Wrench
- 16mm Offset Box Wrench
- 3/8 Drive Metric Socket Set
- 1/2 Driver Metric Socket Set - Includes 19mm 12-point socket
- Hose Clamp Pliers
- Engine Support Bar
- Hydraulic Floor Jack
- Jack Stands
- VAG-COM Software and Cable
- Serpentine Belt 038 903 137 J (with AC)
- Timing Belt 038 109 119 M (100,000 Mile)
- Tensioner 038 109 243 N (100,000 Mile)
- Small Top Roller 058 109 244
- Small Bottom Roller 038 109 244 E
- Large Idler Roller 038 109 244 H
- Large Idler Roller Bolt N 905 969 02
- Camshaft Seal 038 103 085 C
- Crankshaft Seal 034 115 147 A
- Crankshaft Bolt 06A 105 229
- Vacuum pump seal 038 145 345
- Water pump 038 121 011 A
- Coolant
Prep & Removal
First, make sure you have a clean and organized work station to start with. You will be removing a lot of parts so having designated areas to locate and label your parts is important.

Open the hood and inspect the engine you will be working on. Look for any broken lines, brackets, leaks or missing items. You can address or replace these items later.


Since I am planning (and recommend) to replace the water pump during this belt replacement, now is a good time to drain the coolant out of the system. The coolant petcock is located on the lower radiator hose (drivers side bottom). You may have to remove the bottom splash shield if your car is still equipped with it.

With the coolant drained, I find its best to unplug all the hoses and connectors from the coolant reservoir and remove it completely. Some write ups opt to keep the bottom line attached and push it off to the side, but in our case it much rather have the room.

Now you can disconnect and cap the two fuel lines between the fuel filter and the injection pump. Take your time, the clamps are rather snug on the lines even squeezed to their maximum opening ability.
If you haven't replaced your fuel filter in some time, this would be a good opportunity to swap it out.

Remove the upper timing cover. There are small plastic clips around the perimeter that lift off. There is one hidden on the back side down low, it's very hard to see so feel around for it.

Using your 5mm Allen Socket, start removing the valve cover bolts and then lift off the valve cover. The stubby 5mm Allen included in the Metalnerd tool kit will help with the rear bolts. In the case of my car, the bolts were extremely tight and 1/4 drive was not going to cut it, so for the last bolt on the rear of the cover behind the filler cap, I opted to remove the EGR Valve since I also plan on removing and cleaning the intake manifold later.

With the valve cover removed, inspect the cam lobes for wear and look for any sludge buildup in the head, hopefully there won't be any. At this point I like to get under the vehicle and remove the turbo compressor outlet pipe, which conveniently runs right in front of the crankshaft pulley.
Removal is accomplished by removing the 10mm nut securing the pipe to the body and then removing the clamps on either end of the pipe and maneuvering it out carefully.

Going back up top, we can now remove the vacuum pump located on the drivers side of the cylinder head. It is held on with three 13 bolts(studs), however on some models, you will need to remove a small metal bracket held on with a couple of 10mm nuts first. This was not the case on this car, so the bracket is not shown.

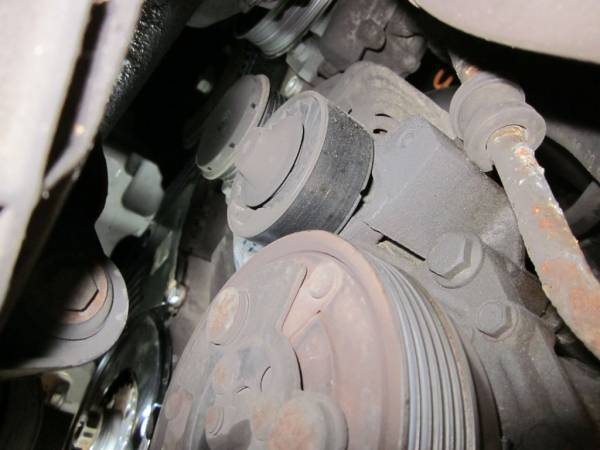
Now is a good time to remove the accessory belt. They do sell specific tensioner pulley wrenches, but I find that a 16mm offset box wrench will do just fine. It is easier to access from the bottom through the wheel wheel rather than from the top. With the tensioner retracted, slide the belt off of the crankshaft and AC compressor, then slowly work your way around until its free.
The 16mm tensioner boss is shown below.

Now we need to get down to business with the actual timing belt removal, but before we do that it is EXTREMELY important to set the engine to TDC (Top Dead Center). To do this we must turn the engine over by hand either by using the cam sprocket holding bar or by using a 19mm 12-point socket on the crankshaft bolt. I prefer using the crankshaft bolt to spin the engine as I watch the #1 cylinder cam lobes. The cam lobes should be in the "up" position as shown below.

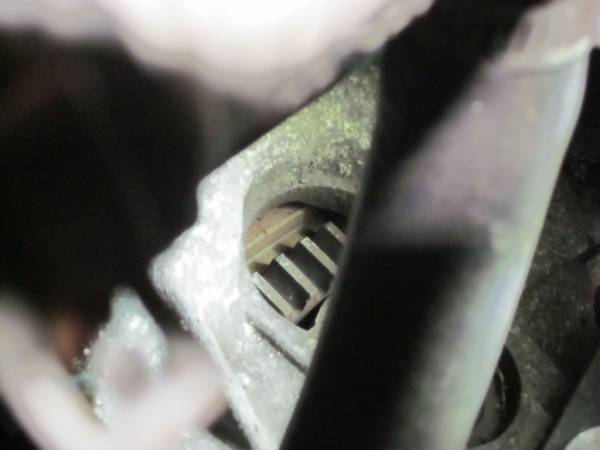
The notch in the end of the camshaft where the vacuum pump would go should also be parallel to the surface of the cylinder head.

On vehicles equipped with a manual transmission, there is a rubber plug at the top of the transmission which will expose the timing mark on the flywheel. Automatics have a similar timing mark on their transmissions. If you did it right the timing mark should appear as shown below.
Now we can install our camshaft locking plate. You may need to wiggle the camshaft a little bit to get it in there, just don't force it. The tolerance is very tight but it will fit with a little effort.

Remove the engine mount alignment plate by removing the two bolts attaching it to the body and the mount.

Now it's time to setup your Engine Support Bar. You do not have to have one of these, you could use a floor jack with a block of wood to support the engine, but these are so cheap now days, even a Horrible Freight model for $50 would be worth investing in. Once the bar is setup, hook it to the lifting eye located on the passenger side of the cylinder head.

With a some tension on the engine support bar, start removing the four engine mount bolts. There are two going from the mount to the body and two going from the mount to the engine bracket.

You should be able to wiggle the mount out from under the power steering reservoir. I have removed the reservoir on previous jobs, but it's extremely messy so if you can work around it, I would recommend leaving it in there.
Now we can gain access to the three bolts holding the mounting bracket to the engine.

There is one hidden bolt towards the rear which is accessible from the top, but the last bolt is easily reached from the bottom through the wheel well.

I've been told and have read that you cannot get the bracket out with the engine in the car, however I have not seen a reason why you can't. I've done it a few times now with very little issue. It does take some maneuvering but it can come out. Raising the engine up with the support bar or your floor jack will make it much easier.
However if you cannot get it out, have no fear you can still keep going, you will just have to work the timing belt in and out around the bracket when time comes.

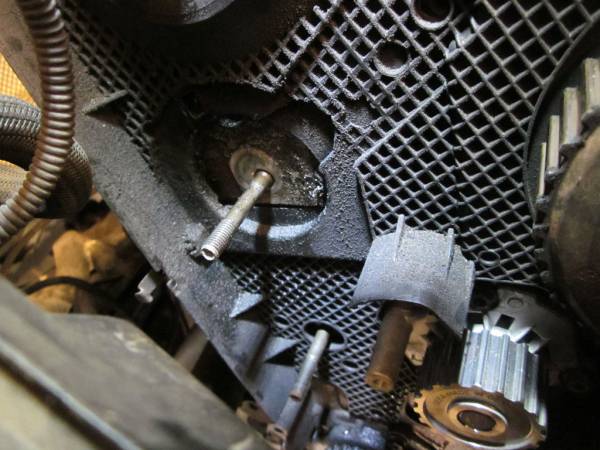
Now we need to remove the harmonic balancer from the crankshaft sprocket. Once you remove the four 6mm Allen bolts, it should come off with a little tug.

With the balancer out of the way, we can now start removing the 10mm timing cover bolts for the lower and middle covers.


Rotate the tensioner counter clockwise using your spanner wrench. This will release some tension from the belt.

Using the camshaft sprocket holder, apply a slight clockwise force as your loosen the camshaft sprocket bolt. Do not remove the bolt completely, just loosen it a few threads so you can see a small gap between the washer and the sprocket.

Attach the camshaft sprocket puller and begin to turn the bolt on the puller until the sprocket breaks free. It will make a loud popping sound when it breaks free, this is normal.

Once the sprocket is broken free, remove the puller, the camshaft sprocket bolt and finally remove the camshaft sprocket.

Now we need to lock the injection pump into place. Included in your tool kit is a locking pin which will need to slide into a designated spot on the pump, through the pump sprocket.

Guide the locking pin into place by carefully rotating the injection pump via the center nut shown above. This will take a little time and finesse, its hard to see so take your time.
It should also be mentioned that the center nut should NEVER be removed. Doing so could disrupt the timing of the pump which would require it to be sent out for a rebuild.

With the the cam and injection pump locked at TDC, now is a good time to replace the water pump. I prefer to do it prior to cleaning anything since it will be getting covered in coolant when the pump is removed. There are only three bolts holding the pump in place, however it does require a good bit of strength to get it out of the engine block.

With the old pump removed, compare it to the new pump and make sure everything looks right. There are many different types and manufactures for these pumps. I've seen impellers made from plastic, resin, steel and even brass. I personally prefer the metal impeller pumps as do many other TDI owners, however the resin pumps are preferred by some. Just make sure you avoid the cheap PepBoys plastic impeller pumps and invest in something that is going to last.

When installing the new water pump, use some new coolant to lubricate the o-ring before it goes in. Its going to be a tight fit so any help it provides will be appreciated. Do NOT use oil or silicone sprays on the o-ring, it is not designed to come in contact with those type of chemicals and I can assure you it will only lead to premature failure.
Once the pump is in place, torque the bolts down securely.

CLEAN! CLEAN! CLEAN! Dirt and oil are the number one killers of timing belts. Before the new belt can even get close to the engine, all the old grime and oil must be cleaned from all the surrounding surfaces. It looks like time has taken its toll on some of the seals so we will be replacing the crankshaft and camshaft oil seals later, but first all the grime needs to leave.
I find going over everything with a parts brush and a can of mineral spirits is a good fist effort to get things loosened up. Once you feel you have hit just about everything you can with the brush, I usually end up wasting 1 - 2 cans of brake parts cleaner to wash everything down and also break up anything the brush couldn't get to.
Notice the lower timing rollers have been removed.
Don't forget to place a drain pan or something to catch all the chemicals and dirt washing down, otherwise you are going to have a not so nice mess waiting for you when you're done.

Removal of the crankshaft seal can be done with a flathead screwdriver and a small hammer or mallet. Simply drive the screwdriver into the seal, being careful not to gouge the crankshaft or outer seal surface. Once the screwdriver is in place, carefully pry the old seal out.
When installing the new seal, either use a seal driver or you can use a small flat punch and tap around the perimeter of the seal being sure to drive it in evenly. Failure to do so will cause the seal the leak.

When I started to clean up my crank sprocket for installation, I noticed a decent amount of pitting most likely cause by the dirt and grime we just removed and the high mileage of my engine. Fortunately, I have a spare lower mileage engine in my shop that I'm eventually going to rebuild so I decided to steal the crank sprocket off that engine instead of using my pitted original. Due to the fact the other engine has been sitting for years, it had some surface rust on it, but a quick visit to the media blaster took care of that.

Now that the replacement sprocket is in installed with a new bolt (88 lb. ft. + 1/4 Turn), we can install the crankshaft locking plate. Before fully tightening the plate, go and double check the timing mark on the flywheel. If the mark has not moved, you can snug down the locking plate bolts.

Replacement of the camshaft seal is basically the same as the crankshaft seal. Make sure you don't gouge any of the sealing surfaces.

Timing Belt Installation
Now we need to install the new timing components before the belt goes in. Since our kit includes all new rollers and tensioner, they need to go in first. Again, compare the new parts with the old ones just to make sure everything is correct.

If you noticed a pair of studs and one roller we're missing in the picture above, that would be because we have not removed them yet, but we will do it now. First is the tensioner stud. There have been reports of these breaking off, but I have never seen one myself, nevertheless we have a new one so we will replace it.
Using a stud remover/installer is great if you have one handy.

Unfortunately, room was not on our side when it came to replacing the lower roller stud, so the double nut technique was used, which is just as effective as a stud remover/installer, at least in this application.

With the new rollers installed and torqued down, we can begin routing the new timing belt where it needs to go. Try to keep the belt as tight as you can between the crank and injection pump, most if not all of the slack should be on the tensioner side.

Here is how the belt should appear so far, notice the last new roller between the injection pump and where the camshaft sprocket will be going.


Going back to the injection pump, loosen but do not remove the 3 bolts around the perimeter of the sprocket. With the injection pump locked, this will allow us to tension the belt properly while keeping the pump in a decent ignition window. We will fine tune this later once everything is back together.

Apply tension to the belt by spinning the tensioner clockwise using your spanner wrench. The two notches or arrows should come together as proper tension is met. Once the tensioner is set, snug the 13mm bolt to hold the tensioner in place, the torque the nut down properly.

Go back and tighten down the camshaft sprocket bolt using the camshaft sprocket holder. This bolt should be torqued to 33 lb ft. Do NOT over tighten this bolt.

You can remove the camshaft locking plate and install the vacuum pump making sure you replace the old seal.

Now that the tensioner is properly set and the cam bolt is torqued properly, go back and tighten the three bolts on the injection pump, then remove the locking pin.
At this point, you should turn the engine over by hand for two complete rotations. If everything is correct, the engine should spin over and you should only feel the normal resistance from the compression in the engine. If the engine does not turn over, do not attempt to force it, turn the engine back to where it was and recheck all your timing marks before you continue.
With two successful rotations, put the engine back to TDC, reinstall the locking pin into the injection pump and recheck the timing mark on the flywheel as well as the marks on the tensioner. If everything lines up, you have completed the belt installation.
You can now install the lower metal timing covers, bottom one first, follow by middle one above it.
The balancer/crank pulley can go on next. Make sure you use a little bit of blue Loctite on the bolts.
I opted for the replacement lower serpentine roller in my timing belt kit, so since I was down there I felt it was a good time to replace this. All that is required is a flathead screwdriver to pop the plastic cap off of the pulley and a 6mm Allen Socket to remove the bolt.
This step should only take a few minutes to complete. Once its installed and torqued, simply snap on the new protective cap.

With both of the lower metal timing covers installed, we can reinstall our engine mount bracket. My kit included new bolts as these should be replaced once they are removed. Remember this bracket might be a little challenging to get back into place, raising the engine up a bit will help a great deal, just take your time and don't force it.
Here is the bracket with new bolts ready to go in.

With the engine bracket installed, you can now slide the engine mount into place. You may need to raise or lower the engine to get it closer to its natural position.
It is very important not to have the engine too high or low as this may put additional stress on the threads. Remember the bracket is just aluminum and can strip out easily if not careful.
I personally prefer to have the engine a little lower then normal, install the mount and the smaller black alignment bracket with their respective bolts, but do not torque them down, just make them close.
I then bring the engine up until it touches the mount and install those bolts. If everything looks good, I start by torquing the large bolts the hold the mount to the bracket first, followed by the bolts holding the mount to the body. Last but not least, the two smaller bolts for the alignment bracket.
Finally you can lower the engine down and remove your engine support bar.
If you haven't done so already, install the valve cover and the coolant reservoir along with all of their appropriate hoses and connections.


Next, we want to refill the cooling system. If you did not drain your cooling system you can omit this step. For those who changed out their water pump, you will need to do this step. First, use the correct coolant for your Volkswagen. Do not purchase the normal green or orange coolants from the convenience store, you will need the correct violet coolant like the brands shown below.
These will need to be mixed with water, a perfect 50/50 mix should yield freezing protection down to approximately -37°F. This is perfect for most North American climates.
If you live in a warmer climate, it is still recommended to be around a 50/50 mix. Do not fill your cooling system with straight water. The coolant/antifreeze provides lubrication for the water pump as well as preventing corrosion and rust.

Now you should be almost back to where you start from. Take a look and make sure you have no parts or pieces left on your work bench other than the upper plastic timing cover.

Before we can call this job finished, we will most likely need to adjust the injection pump timing. It should be in an operational window right now, but will need to be fine tuned.
It is recommended that you "bump" the engine over a few times with the starter to rotate the belt around and check that it is tracking properly on the sprockets. I have also done this by starting it for a brief second and shutting it down immediately. Do not be surprised if the new belt does not track exactly where the old one did. What is important is that it is not hanging off or walking off any of the sprockets. If this occurs it is likely to happen at the injection pump, which would require shimming of the injection pump or replacement of the bracket. I have not seen this occur on any of the vehicles I've worked on, but it is always good to check.
We can now check and adjust the injection pump timing. Start your car and let it run. I typically let it reach operating temperature first. This gives ample time to allow any air in the fuel system to work itself out.
Power up your laptop and connect your VAGCOM cable from your laptop to the OBD port under the dash. Start your VCDS program, you should see this window open up, click on Select.


Group 000 should already be entered when the window comes up. Press "Go!" and watch table 2 and table 9. Table 9 is fuel temperature, some write ups and discussions say this should be around 110 while table 2 reads 70. I have never seen table 9 read 110 on any of the cars I've worked on, its always between 104 - 107, which I believe is still well withing the normal range.
In order to adjust table 2 and bring it close to 70, you will need to loosen (do NOT remove) the three bolts on the injection pump and turn the pump ever so slightly by the 22mm nut in the middle. Please note that this adjustment is VERY sensitive, the first time I did one of these I think I spent close to an hour chasing the number from low to high, all the while confusing myself trying to remember which way I rotated it last.
Rotating the pump counter-clockwise will make the number in table 2 increase, rotating it clockwise will make it decrease.
Again, turning it just a hair can effect the number by 5.

Once you have your timing set, I would recommend swapping the old injection pump bolts out for the newer non-stretch style bolts. By removing one and replacing one at a time, you will not alter the timing you just set and it also saves wear and tear on the new bolts had you installed them prior setting the timing.
You can now install the plastic upper timing cover.
Congratulations! You just completed your timing belt replacement and saved yourself a bunch of cash in the process.
There are 0 Comments.
Say Something.You have to log in to comment...
We'll publish your comment after you're logged in.
Written by:Ten Six Garage
Related HowTune Articles
Written by:sytyguy
Adjusting Headlamps
Written by:BagOfArms
Replacing the shift knob
Written by:BagOfArms
Remove the Fuel Tank
Written by:cpeterson
Replace the Cabin Air Filter
Written by:iturgeon
Replacing the Clutch
Get notified about new articles.
We don't sell or share your info.